Developer Guide
- Acknowledgements
- Setting up, getting started
- Design
-
Implementation
- Add tutor feature
- List tutor feature
- Edit tutor feature
- Find tutor feature
- Delete tutor feature
- Add schedule feature
- Edit schedule feature
- List schedule feature
- Find schedule feature
- Mark schedule feature
- Unmark schedule feature
- Delete schedule feature
- Show calendar feature
- Change theme feature
- Split
MainWindowto display both tutor and schedule list together - Sorting of schedules
- Documentation, logging, testing, configuration, dev-ops
- Appendix: Requirements
- Appendix: Instructions for manual testing
-
Appendix: Planned enhancements
- Tutor name case sensitivity
- Editing a tutor allocated to a schedule
- Disallowing future schedules to be marked
- Streamline datetime input
- Tutor and schedule information view
- Calendar row view
- Switching back to list view from calendar view
- Schedules at the same time being arranged alphabetically
- Accepting one input for theme change
- List schedule by pending status
Acknowledgements
- The foundational code was derived from Addressbook-level3
- Current time display in status bar was reused from James_D at stackoverflow.
Setting up, getting started
Refer to the guide Setting up and getting started.
Design
.puml files used to create diagrams in this document docs/diagrams folder. Refer to the PlantUML Tutorial at se-edu/guides to learn how to create and edit diagrams.
Architecture
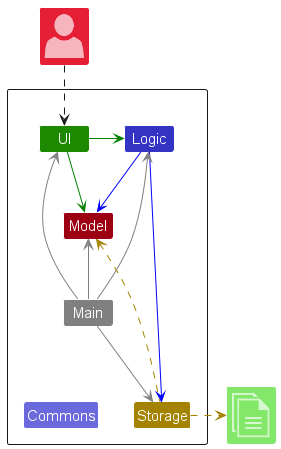
The Architecture Diagram given above explains the high-level design of the App.
Given below is a quick overview of main components and how they interact with each other.
Main components of the architecture
Main (consisting of classes Main and MainApp) is in charge of the app launch and shut down.
- At app launch, it initializes the other components in the correct sequence, and connects them up with each other.
- At shut down, it shuts down the other components and invokes cleanup methods where necessary.
The bulk of the app’s work is done by the following four components:
-
UI: The UI of the App. -
Logic: The command executor. -
Model: Holds the data of the App in memory. -
Storage: Reads data from, and writes data to, the hard disk.
Commons represents a collection of classes used by multiple other components.
How the architecture components interact with each other
The Sequence Diagram below shows how the components interact with each other for the scenario where the user issues the command delete-t 1.
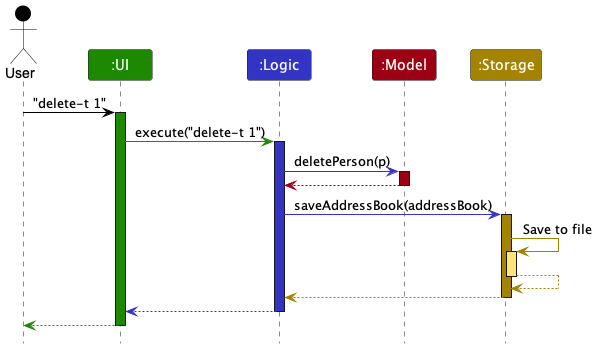
Each of the four main components (also shown in the diagram above),
- defines its API in an
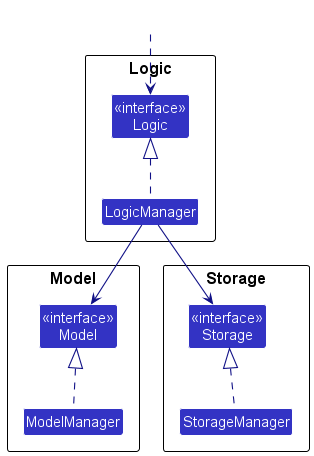
interfacewith the same name as the Component. - implements its functionality using a concrete
{Component Name}Managerclass (which follows the corresponding APIinterfacementioned in the previous point.
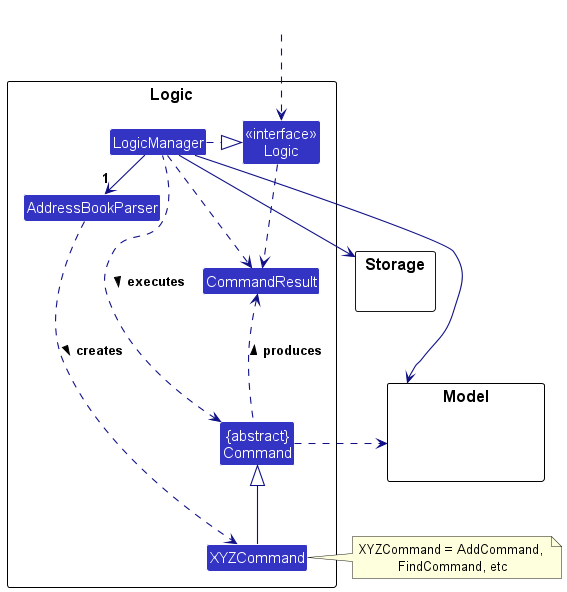
For example, the Logic component defines its API in the Logic.java interface and implements its functionality using the LogicManager.java class which follows the Logic interface. Other components interact with a given component through its interface rather than the concrete class (reason: to prevent outside component’s being coupled to the implementation of a component), as illustrated in the (partial) class diagram below.
The sections below give more details of each component.
UI component
The API of this component is specified in Ui.java
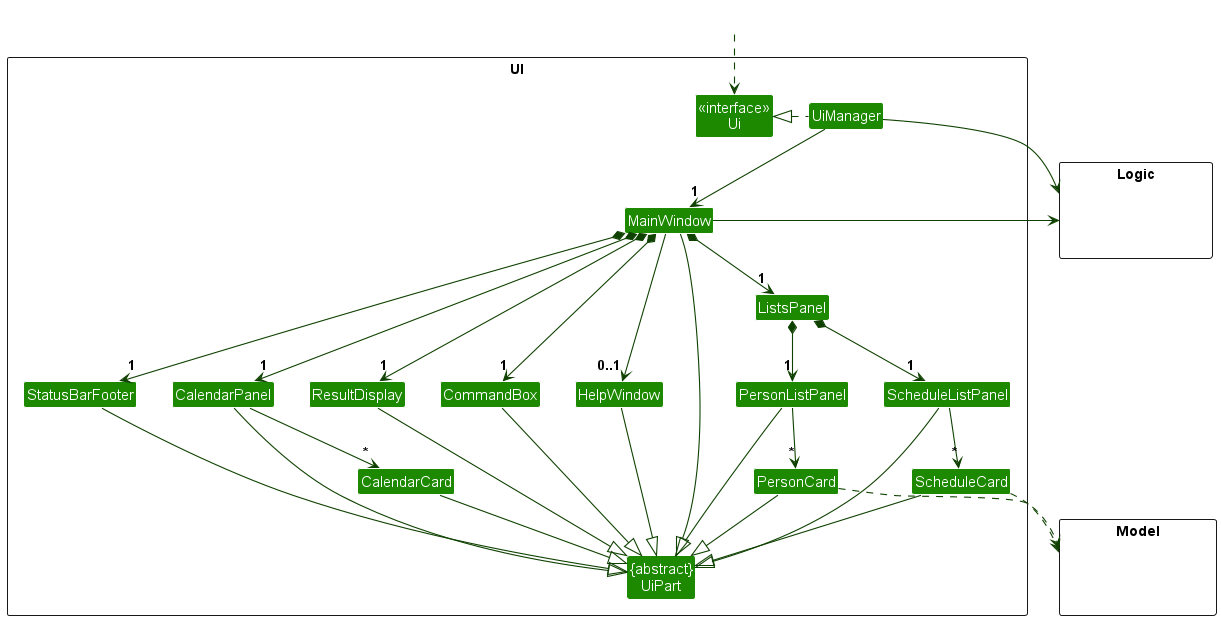
The UI consists of a MainWindow that is made up of parts e.g.CommandBox, ResultDisplay, ListsPanel, PersonListPanel, ScheduleListPanel, CalendarPanel, StatusBarFooter etc. All these, including the MainWindow, inherit from the abstract UiPart class which captures the commonalities between classes that represent parts of the visible GUI.
The UI component uses the JavaFx UI framework. The layout of these UI parts are defined in matching .fxml files that are in the src/main/resources/view folder. For example, the layout of the MainWindow is specified in MainWindow.fxml
The UI component,
- executes user commands using the
Logiccomponent. - listens for changes to
Modeldata so that the UI can be updated with the modified data. - keeps a reference to the
Logiccomponent, because theUIrelies on theLogicto execute commands. - depends on some classes in the
Modelcomponent, as it displaysPersonobject residing in theModel.
Logic component
API : Logic.java
Here’s a (partial) class diagram of the Logic component:
The sequence diagram below illustrates the interactions within the Logic component, taking execute("delete-t 1") API call as an example.
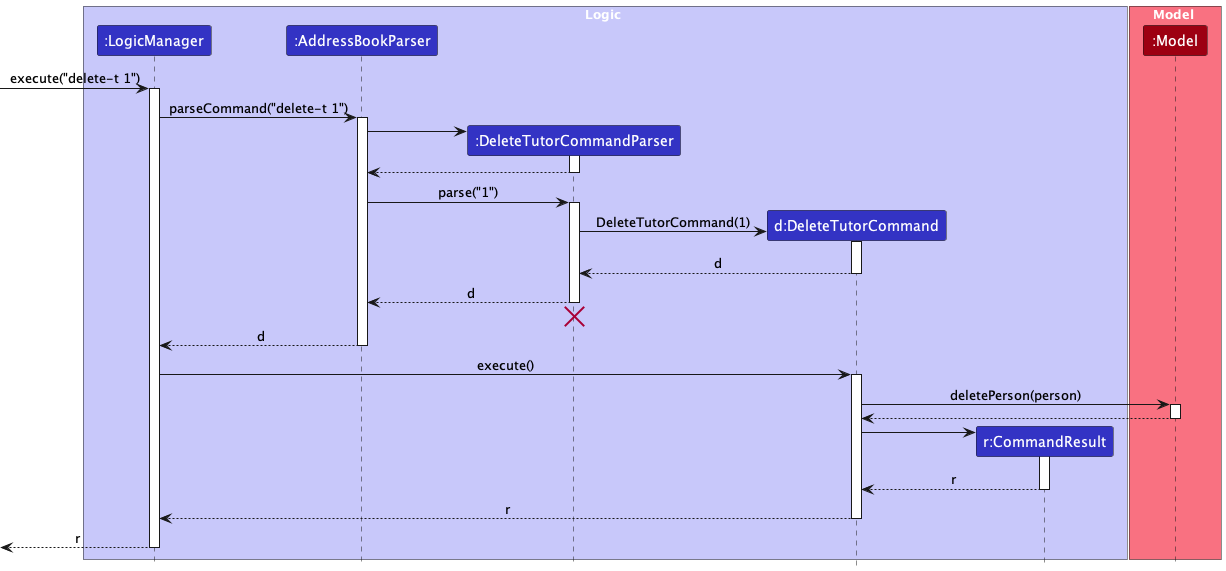
DeleteTutorCommandParser should end at the destroy marker (X) but due to a limitation of PlantUML, the lifeline reaches the end of diagram.
How the Logic component works:
- When
Logicis called upon to execute a command, it is passed to anAddressBookParserobject which in turn creates a parser that matches the command (e.g.,DeleteTutorCommandParser) and uses it to parse the command. - This results in a
Commandobject (more precisely, an object of one of its subclasses e.g.,DeleteTutorCommand) which is executed by theLogicManager. - The command can communicate with the
Modelwhen it is executed (e.g. to delete a person). - The result of the command execution is encapsulated as a
CommandResultobject which is returned back fromLogic.
Here are the other classes in Logic (omitted from the class diagram above) that are used for parsing a user command:
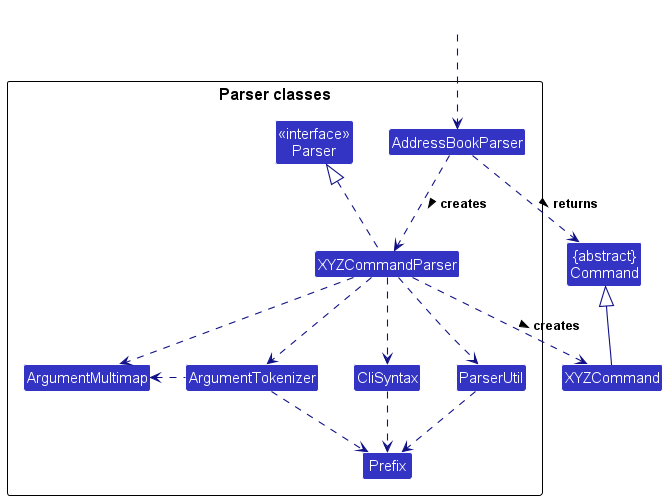
How the parsing works:
- When called upon to parse a user command, the
AddressBookParserclass creates anXYZCommandParser(XYZis a placeholder for the specific command name e.g.,AddTutorCommandParser) which uses the other classes shown above to parse the user command and create aXYZCommandobject (e.g.,AddTutorCommand) which theAddressBookParserreturns back as aCommandobject. - All
XYZCommandParserclasses (e.g.,AddTutorCommandParser,DeleteTutorCommandParser, …) inherit from theParserinterface so that they can be treated similarly where possible e.g, during testing.
Model component
API : Model.java
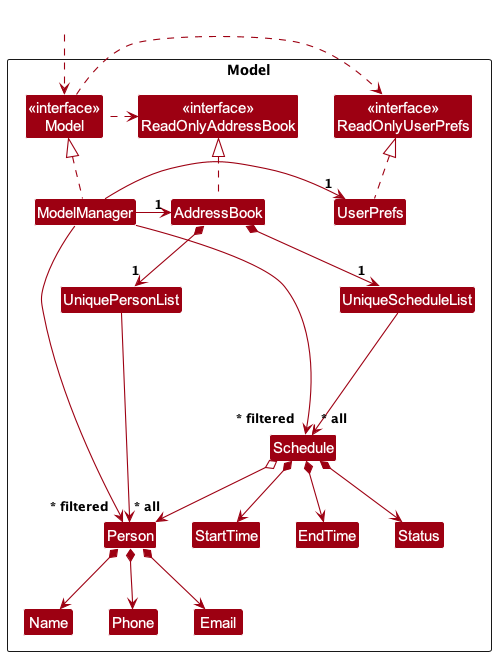
The Model component,
- stores the address book data i.e., all
Personobjects (which are contained in aUniquePersonListobject) andScheduleobjects (which are contained in aUniqueScheduleListobject). - stores the currently ‘selected’
Personobjects (e.g., results of a search query) as a separate filtered list which is exposed to outsiders as an unmodifiableObservableList<Person>that can be ‘observed’ e.g. the UI can be bound to this list so that the UI automatically updates when the data in the list change. - similarly also stores the currently ‘selected’
Scheduleobjects and this is exposed to outsiders as an unmodifiableObservableList<Schedule> - stores a
UserPrefobject that represents the user’s preferences. This is exposed to the outside as aReadOnlyUserPrefobjects. - does not depend on any of the other three components (as the
Modelrepresents data entities of the domain, they should make sense on their own without depending on other components)
Storage component
API : Storage.java
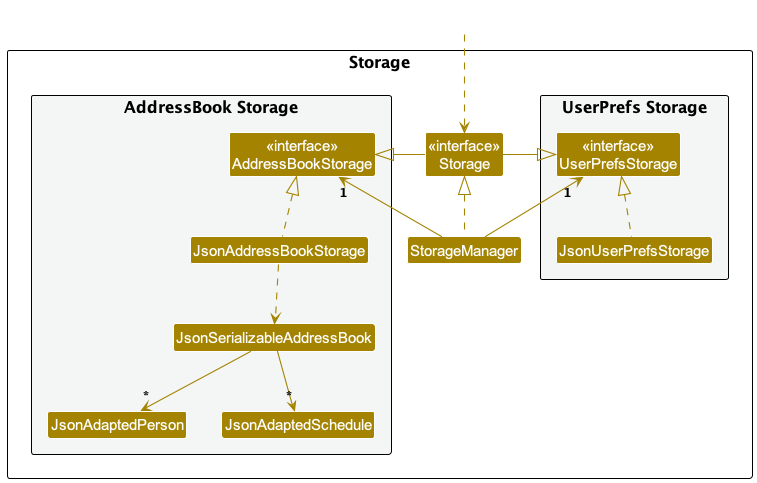
The Storage component,
- can save both address book data and user preference data in JSON format, and read them back into corresponding objects.
- inherits from both
AddressBookStorageandUserPrefStorage, which means it can be treated as either one (if only the functionality of only one is needed). - depends on some classes in the
Modelcomponent (because theStoragecomponent’s job is to save/retrieve objects that belong to theModel)
Common classes
Classes used by multiple components are in the seedu.addressbook.commons package.
Implementation
This section describes some noteworthy details on how certain features are implemented.
parseIndex, parseName, etc) have been omitted from the implementation details below.
Add tutor feature
The “Add Tutor” feature allows users to add a new tutor to the address book. Below, we provide an example usage scenario and a detailed description of how the add tutor mechanism behaves at each step.
The following shows the activity diagram from when a user executes the add-t command:
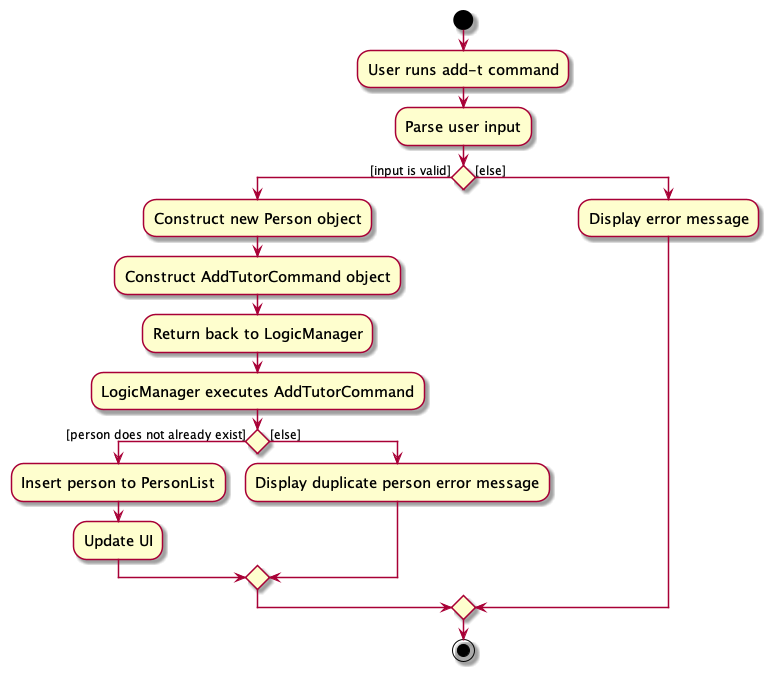
Implementation details
Step 1. The user launches the application for the first time.
Step 2. The user executes add-t n/John Doe p/98765432 e/johnd@example.com to add a tutor to the address book. The
command is parsed in AddressBookParser.
Step 3. AddTutorCommandParser is created, which constructs the Person to be added. The AddTutorCommand is
called with the Person created.
Step 4. The AddTutorCommand object executes the addPerson method through the LogicManager. The method then
adds the Person in model and returns the CommandResult.
The following sequence diagram shows how the above steps for add tutor operation works:
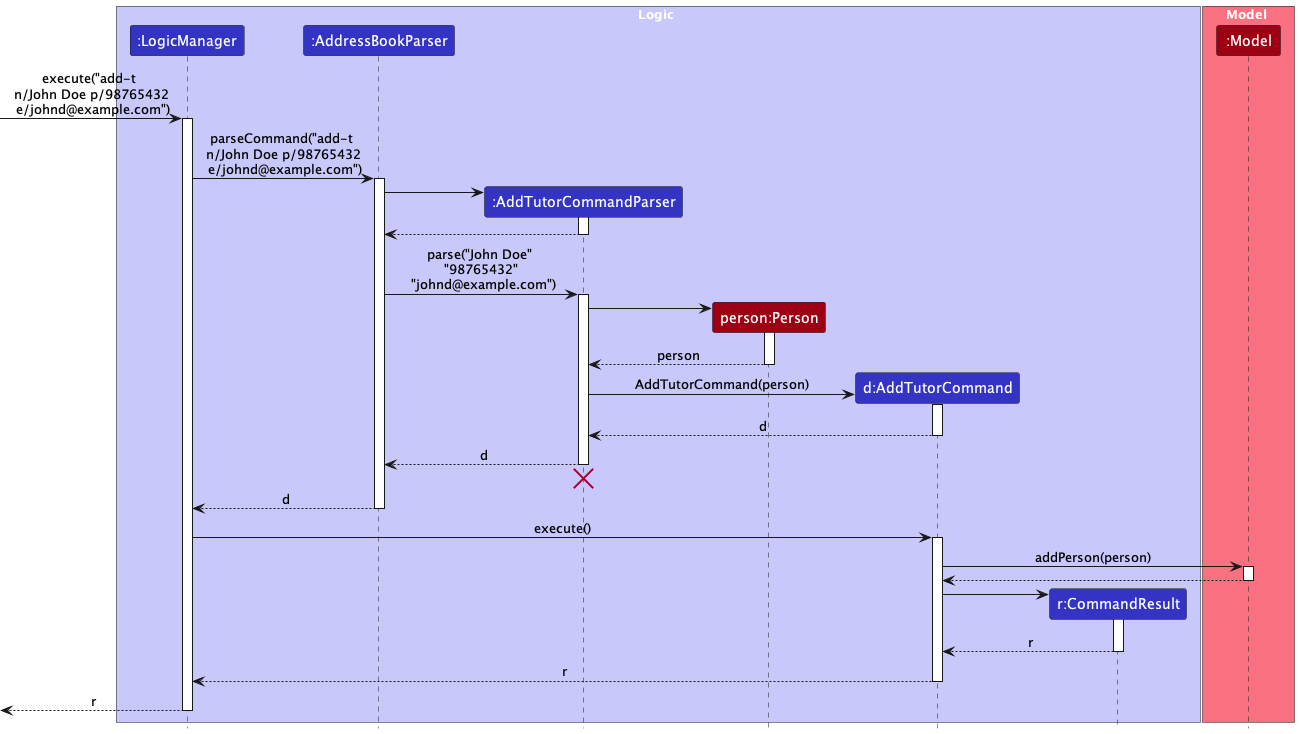
AddTutorCommandParser should end at the destroy marker (X) but due to a limitation of PlantUML,
the lifeline reaches the end of diagram.
Design rationale
Aspect: Optional fields
-
Alternative 1: Allow optional fields when adding tutor (e.g. user can omit phone number or email when adding a
tutor).
- Pros: Allows users to input only necessary fields.
- Cons: Increases code complexity to handle blank fields.
-
Alternative 2 (current choice): Disallow optional fields when adding tutor (user must enter name, phone
number and email).
- Pros: Easier to implement, and less error prone.
- Cons: Users must have every field filled before they can add a tutor.
Aspect: Non-unique phone number and email restriction
-
Alternative 1: Allow only unique phone numbers and emails or tutors.
- Pros: Decreases erroneous user input when duplicated tutors are entered.
- Cons: There can be real life scenarios where tutors have the same phone numbers of emails (since there is no strict requirement against it).
-
Alternative 2 (current choice): Allow only non-unique phone numbers and emails of tutors.
- Pros: In line with real-life scenario as mentioned above.
- Pros: Phone numbers and emails are means of contacting the tutors and there is no real need for them to be unique.
- Cons: Duplicated tutors could be added.
Aspect: Tutor name restrictions
-
Alternative 1: Allow tutors to have name input as only alphabets.
- Pros: Decreases erroneous user input when phone numbers are accidentally input as names using
n/tags. - Cons: With the implementation of unique names, tutor names cannot be differentiated with numbers.
- Pros: Decreases erroneous user input when phone numbers are accidentally input as names using
-
Alternative 2 (current choice): Allow tutors to have alphanumeric names.
- Pros: Tutors with the same name can be differentiated with numbers.
- Pros: Tutors’ names are restricted to a limited number of characters to promote easy searching and reference in the future. This also introduces uniformity.
- Cons: Number inputs are accepted as names, and users can erroneously use phone numbers as names instead.
- Cons: Tutors’ names with commas cannot be recognised and entered.
-
Alternative 3: Allow tutors to have names with special characters, especially commas.
- Pros: More representative of various name types, especially those with commas in their names.
- Cons: Allowing too many special characters decreases the ability to locate and reference the tutors in the future (e.g. ABC,123@!?:” should not be accepted as a valid name).
List tutor feature
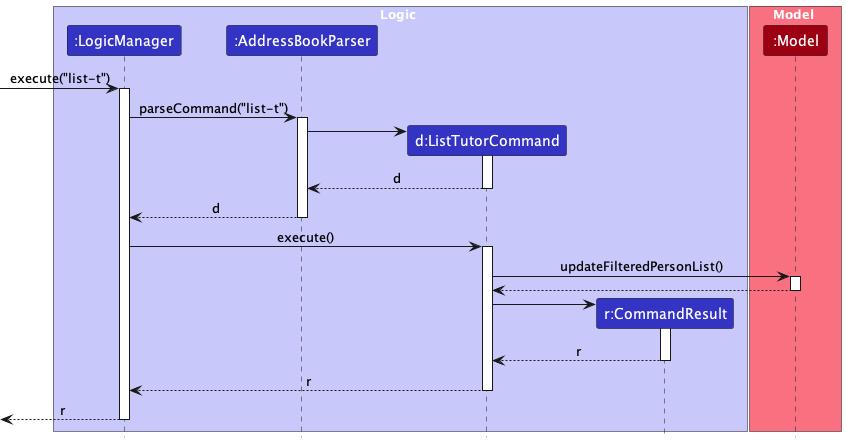
The “List Tutor” feature allows users to view the list of existing tutors in the address book. Below, we provide an example usage scenario and a detailed description of how the list tutor mechanism behaves at each step.
The following shows the activity diagram from when a user executes the list-t command:
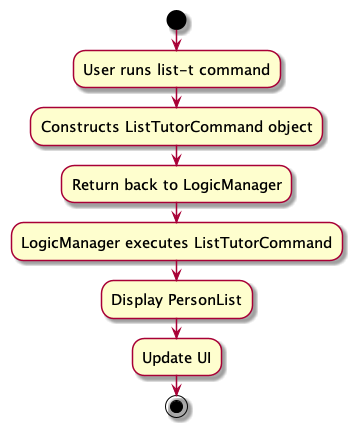
Implementation details
Step 1. The user has the application launched with at least 1 tutor added.
Step 2. The user executes list-t to view the full list of existing tutors. The command is parsed in
AddressBookParser.
Step 3. A ListTutorCommand object is constructed.
Step 4. The LogicManager calls the execute method in ListTutorCommand, which calls the updateFilteredPersonList
method with the PREDICATE_SHOW_ALL_PERSONS predicate in the ModelManager to remove any filters on the
PersonList so that the full list of existing tutors is displayed.
Step 5. Finally, the ListTutorCommand object returns the CommandResult.
The following sequence diagram shows how the above steps for list tutor operation works:
Design rationale
The list-t command was designed this way to ensure consistency with the previous list command in AB3.
Edit tutor feature
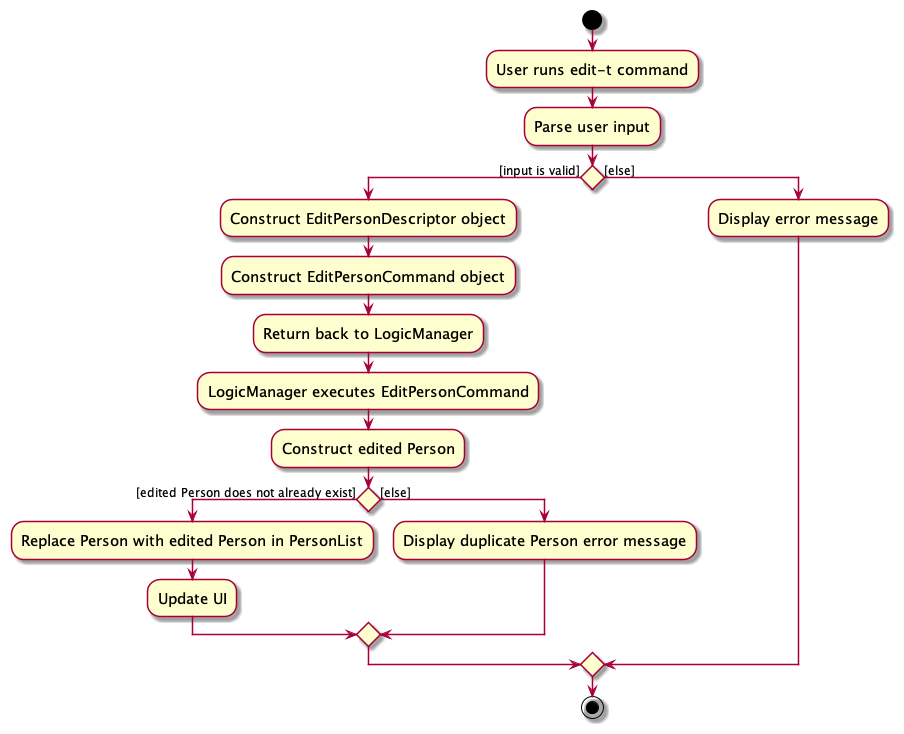
The “Edit Tutor” feature allows users to edit an existing tutor in the address book given a tutor index.
The following shows the activity diagram from when a user executes the edit-t command:
Implementation details
Step 1. The user has the application launched with at least 1 tutor added.
Step 2. The user executes list-t to view all added tutors.
Step 3. The user executes edit-t 1 n/John Doe to edit the first tutor’s name in the list of tutors displayed.
The command is parsed in AddressBookParser.
Step 4. EditTutorCommandParser is created, and constructs an EditPersonDescriptor which describes the edited
Person (omitted in sequence diagram below for brevity). An EditTutorCommand object is then constructed with this
EditPersonDescriptor and the specified tutor index.
Step 5. The EditTutorCommand object gets the specified Person from the current filtered person list using the
tutor index.
Step 6. EditTutorCommand object then creates an edited Person from the specified Person and the EditPersonDescriptor.
Step 7. EditTutorCommand object then calls the setPerson method in the ModelManager with the new edited Person.
This method sets the specified Person in the model to be that edited Person.
Step 8. Finally, the EditTutorCommand object updates the person list to display the edited Person.
The following sequence diagram shows how the above steps for edit tutor operation works:
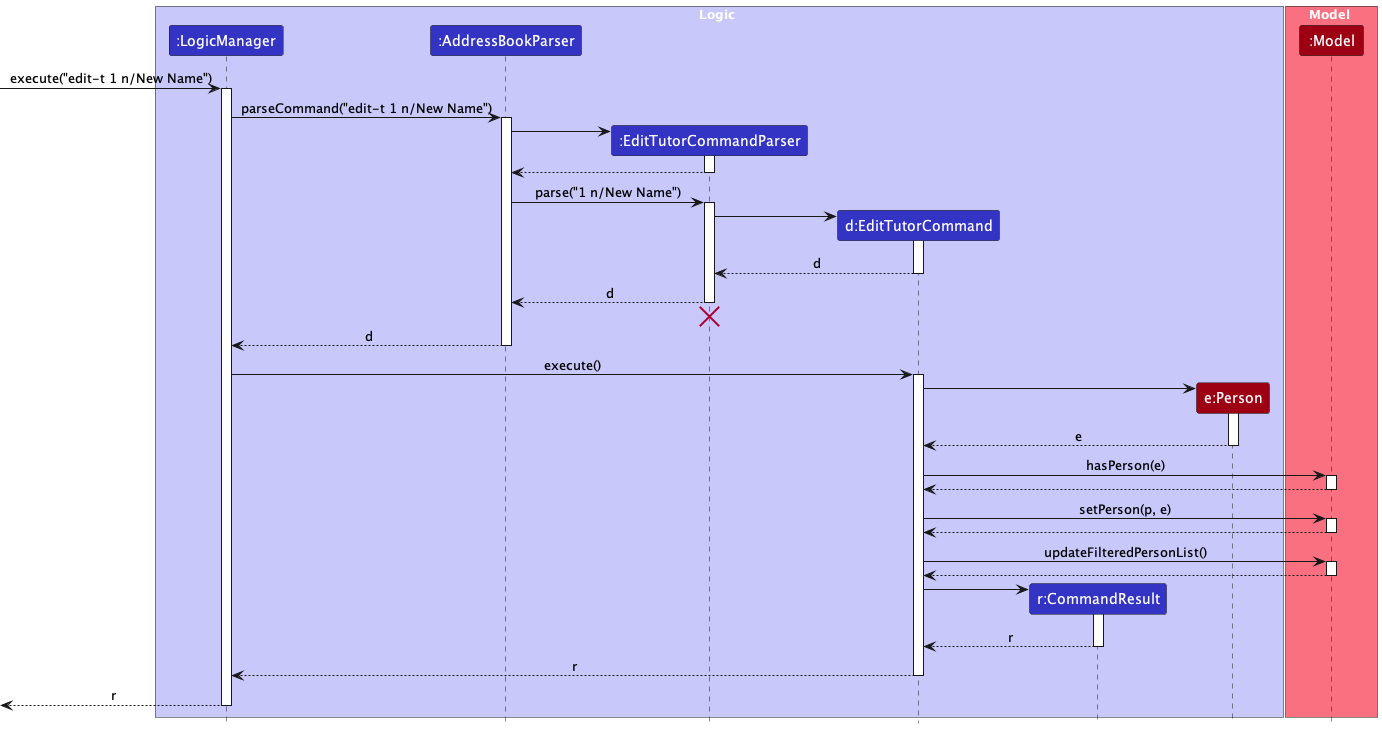
EditTutorCommandParser should end at the destroy marker (X) but due to a limitation of PlantUML,
the lifeline reaches the end of diagram.
Design rationale
Aspect: Specifying which tutor to edit
-
Alternative 1 (current choice): Using tutor index.
- Pros: Using the tutor index provides a clear and unambiguous way for users to specify which tutor they want to edit. The index corresponds directly to the position of the tutor in the displayed list, making it easy for users to identify the target tutor.
- Pros: Using the tutor index eliminates the potential challenge of dealing with long or complex names. Users do not need to type out the entire name, which can be especially beneficial if a tutor has a lengthy or complicated name.
- Pros: Using the tutor index aligns with the existing command structure, which is based on numeric indices for identifying and interacting with specific entries in the address book.
- Cons: Users need to have knowledge of the specific index of the tutor they want to edit. This may require them to
first execute a
list-tcommand to view the current list of tutors and their corresponding indices.
-
Alternative 2: Using tutor name.
- Pros: Allowing users to edit a tutor by specifying their name provides a more natural and intuitive method, as users are likely more familiar with names than numeric indices.
- Cons: If a user provides an incorrect or misspelled name, the application would need to handle error cases and provide appropriate feedback to guide the user.
- Cons: Names can be long, complex, or have unusual spellings, which may make them more challenging to type accurately. This can lead to potential input errors or mismatches if the user misspells or mistypes the name.
- Cons: Names are case-sensitive. This means that users need to accurately input the name with the correct capitalization, which can add an extra layer of precision required from the user.
Find tutor feature
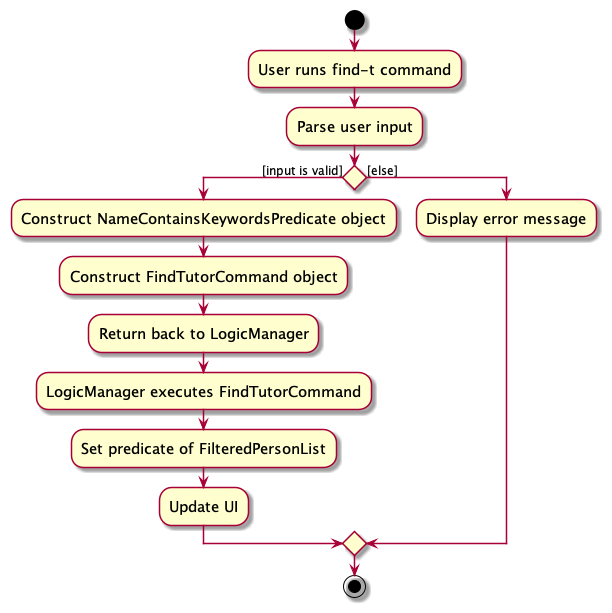
The “Find Tutor” feature allows users to search for tutors based on the tutor’s name.
The following shows the activity diagram from when a user executes the find-t command:
Implementation details
Step 1. The user has the application launched.
Step 2. The user executes find-t John Doe to search for tutors whose name contains “John” or “Doe. The command is
parsed in the AddressBookParser.
Step 3. FindTutorCommandParser is created, and constructs a NameContainsKeywordsPredicate which matches for any of
the search keywords. A FindTutorCommand object is then constructed with this predicate.
Step 4. The LogicManager calls the execute method in FindTutorCommand which sets the predicate of the filtered persons
list in ModelManager to be the predicate created earlier.
Step 5. The result of the command execution is encapsulated as a CommandResult object which is returned back from
Logic.
Step 6. The filtered list of tutors is displayed to the user.
The following sequence diagram shows how the above steps for find tutor operation works:
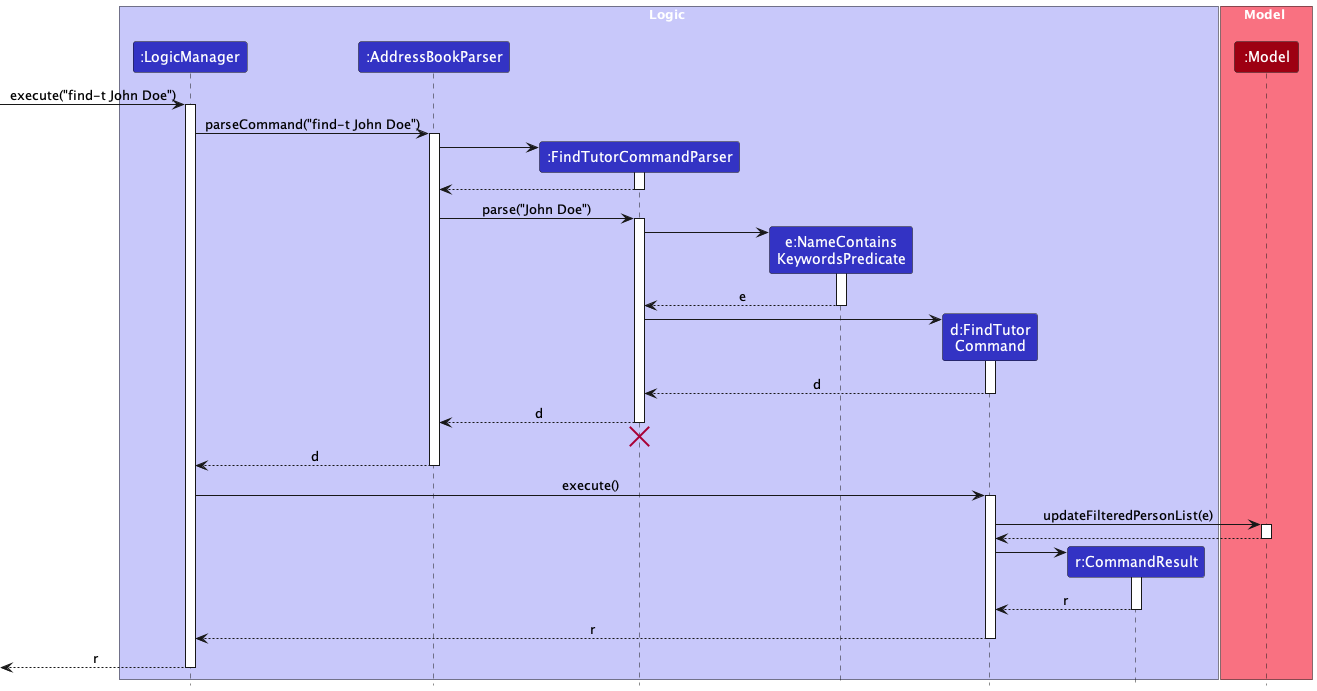
FindTutorCommandParser should end at the destroy marker (X) but due to a limitation of PlantUML,
the lifeline reaches the end of diagram.
Design rationale
Aspect: Search criteria
-
Alternative 1 (current choice): Only allowing users to search for tutors based on their names.
- Pros: This design provides a straightforward and clear search functionality for users, aligning with the common understanding of searching for specific individuals by name.
- Pros: It simplifies the search process and reduces cognitive load for users, as they only need to provide the tutor’s name.
- Cons: If a user has incomplete or incorrect information about the tutor’s name, they may not be able to find the desired tutor.
-
Alternative 2: Specifying search criteria like tutor phone number or email.
- Pros: Users would have the ability to search for tutors based on a wider range of criteria, such as phone number and email.
- Cons: Implementing advanced search criteria may lead to a more complex user interface and search mechanism, potentially requiring additional user training or guidance.
Delete tutor feature
The “Delete Tutor” feature allows users to delete an existing tutor in the address book given a tutor index. Below, we provide an example usage scenario and a detailed description of how the delete tutor mechanism behaves at each step.
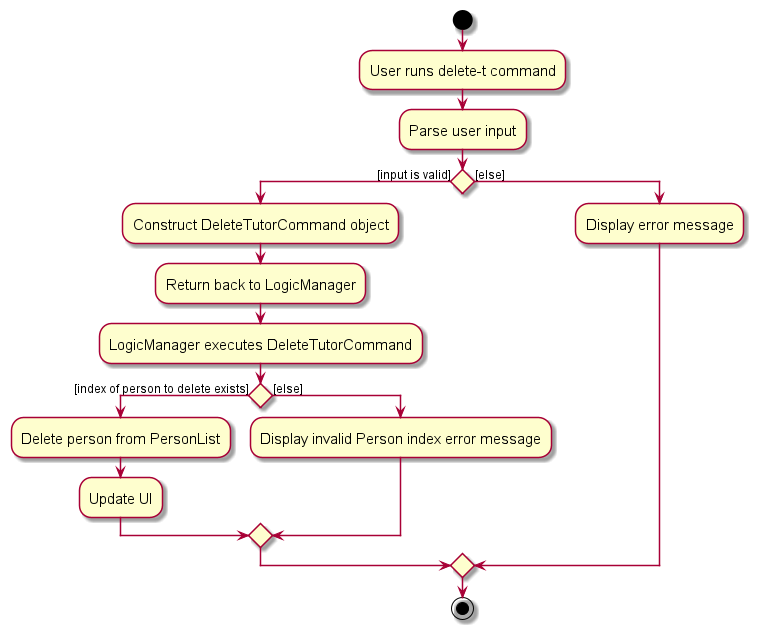
The following shows the activity diagram when a user executes the delete-t command:
Implementation details
Step 1. The user has the application launched with at least 1 tutor added.
Step 2. The user executes list-t to view all added tutors.
Step 3. The user executes delete-t 1 to delete the tutor with index 1 in the list of tutors displayed.
The command is parsed in the AddressBookParser.
Step 4. DeleteTutorCommandParser is created and gets the index of the tutor to be deleted.
A DeleteTutorCommand object is then constructed with the specified tutor index.
Step 5. The DeleteTutorCommand object gets the specified person from the current filtered person list using the tutor
index.
Step 6. The DeleteTutorCommand object then calls the deletePerson method in the ModelManager with the specified
person to delete. This method deletes the specified Person in the model.
Step 7. Finally, the DeleteTutorCommand object returns the CommandResult.
The following sequence diagram shows how the above steps for delete tutor operation works:
DeleteTutorCommandParser should end at the destroy marker (X)
but due to a limitation of PlantUML, the lifeline reaches the end of diagram.
Design rationale
The delete-t command was designed this way to ensure consistency with the previous delete command in AB3.
Aspect: Specifying which tutor to delete
-
Alternative 1 (current choice): Using tutor index.
- Pros: Using the tutor index provides a clear and unambiguous way for users to specify which tutor they want to delete. The index corresponds directly to the position of the tutor in the displayed list, making it easy for users to identify the target tutor.
- Pros: Using the tutor index eliminates the potential challenge of dealing with long or complex names. Users do not need to type out the entire name, which can be especially beneficial if a tutor has a lengthy or complicated name.
- Pros: Using the tutor index aligns with the existing command structure, which is based on numeric indices for identifying and interacting with specific entries in the address book.
- Cons: Users need to have knowledge of the specific index of the tutor they want to delete. This may require them to
first execute a
list-tcommand to view the current list of tutors and their corresponding indices.
-
Alternative 2: Using tutor name.
- Pros: Allowing users to delete a tutor by specifying their name provides a more natural and intuitive method, as users are likely more familiar with names than numeric indices.
- Cons: If a user provides an incorrect or misspelled name, the application would need to handle error cases and provide appropriate feedback to guide the user.
- Cons: Names can be long, complex, or have unusual spellings, which may make them more challenging to type accurately. This can lead to potential input errors or mismatches if the user misspells or mistypes the name.
- Cons: Names are case-sensitive. This means that users need to accurately input the name with the correct capitalization, which can add an extra layer of precision required from the user.
Add schedule feature
The “Add Schedule” feature allows users to add a new schedule to the address book. Below, we provide an example usage scenario and a detailed description of how the add schedule mechanism behaves at each step.
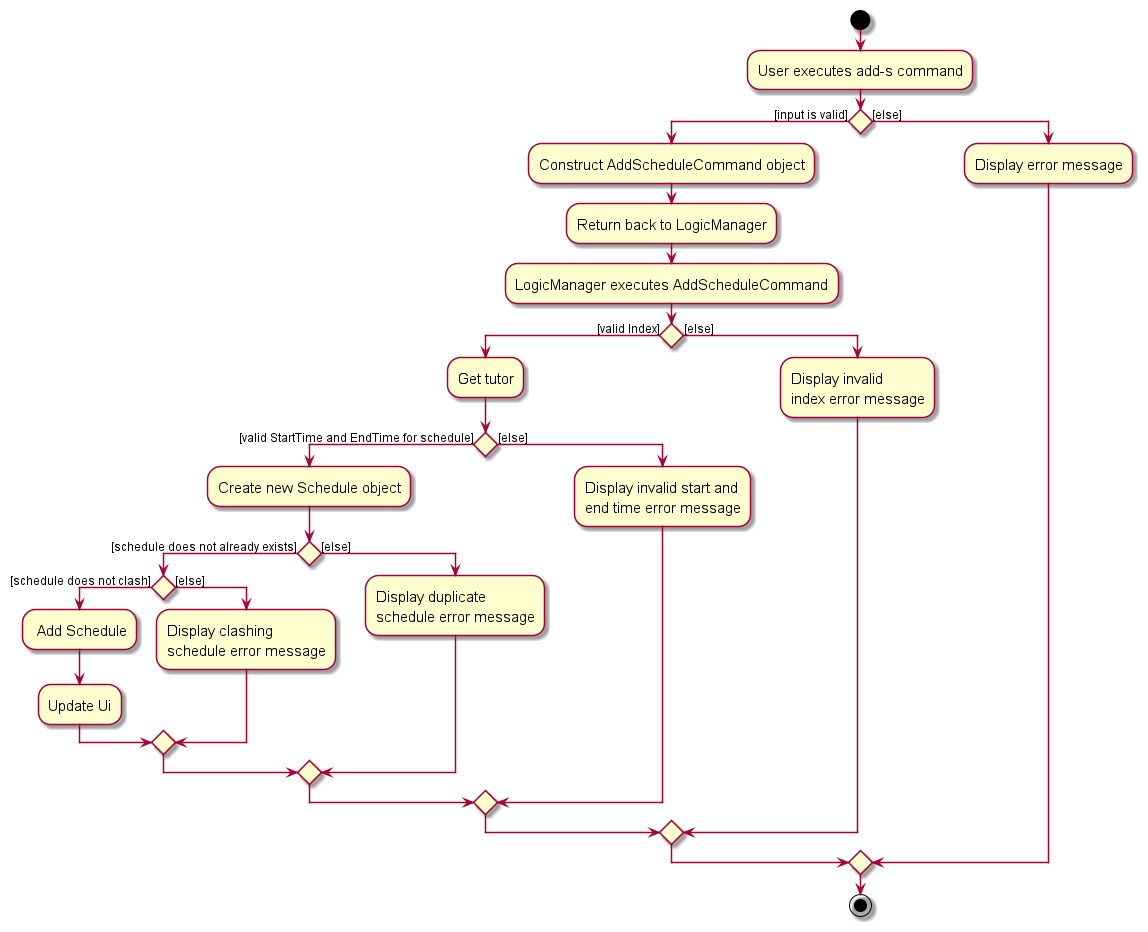
The following shows the activity diagram from when a user executes the add-s command:
Implementation details
The add schedule feature is facilitated by AddScheduleCommand. It extends Command with the necessary implementation
to add a schedule to a Model. Additionally, it implements the following operation:
-
AddScheduleCommand#execute(Model)— Adds the schedule to theModel.
This operation is exposed in the abstract Command class as an abstract method.
Given below is an example usage scenario and how the add schedule command behaves.
Step 1. The user has the application launched with at least 1 tutor added.
Step 2. The user executes add-s 1 st/2023-09-15T09:00 et/2023-09-15T11:00 command.
Step 3. The AddScheduleCommandParser will be initialized to parse the user input to create a AddScheduleCommand
with a Index, StartTime and EndTime representing the user’s input.
Step 4. The AddScheduleCommand#execute(Model) will perform the following checks in this order to ensure that the
Schedule can be added to the Model:
- The
Indexis valid. - A valid schedule can be created with the given
Index,StartTimeandEndTime. Note: A
 Scheduleis considered valid if its start time is before its end time and both start time and end time falls on the same day. This is enforced by the constructor of theScheduleclass, it throws anIllegalArgumentExceptionif it is not valid. - Executing this command would not result in a duplicate schedule in the
Model. Note: A Scheduleis considered a duplicate if it belongs to the samePersonand have the sameStartTimeandEndTimeas an existing schedule in theModel. - Executing this command would not result in a clashing schedule for the tutor specified by
Indexin theModel. Note: A Scheduleis considered a clashing if it belongs to the samePersonand have overlapping times. This is checked bySchedule#isClashing(Schedule).
If any of these checks fail, a CommandException with an appropriate error message will be thrown. Otherwise, it will
create a Schedule and use Model::addSchedule to add the schedule to the Model.
The following sequence diagram shows how the operation works:
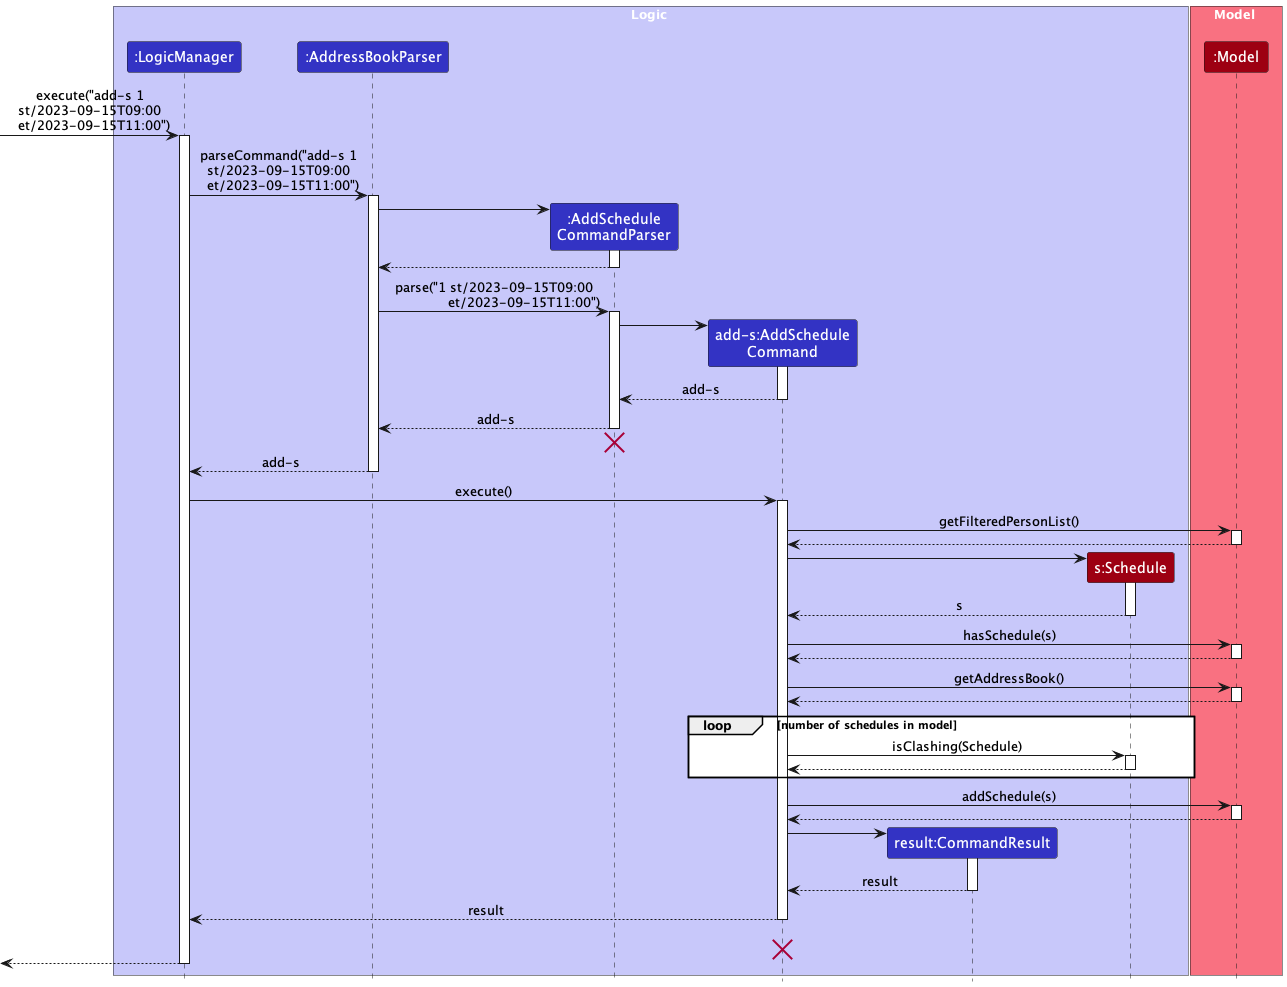
AddScheduleCommandParser and AddScheduleCommand should end at the destroy marker (X) but due to a limitation of PlantUML, the lifeline reaches the end of diagram.
Design rationale
Aspect: Checking for clashing schedule:
-
Alternative 1 (current choice): Perform the check in
AddScheduleCommand.- Pros: Easy to implement.
- Cons: Have to directly access schedules in the
UniqueScheduleList, creating dependencies. - Cons: Can be inefficient, as we have to iterate over all schedules in the schedule list.
-
Alternative 2: Perform the check in
UniqueScheduleList.- Pros: Consistent throughout the system as this check is enforced on all schedules being added to the
UniqueScheduleListregardless of where it is being added from. - Pros: Can be optimised to use more efficient searching algorithms like binary search if the implementation of the underlying list is sorted.
- Cons: Every schedule in the system have to adhere to that. For e.g., if we want to allow the user to override such constraints it would not be possible without modifying the functionality of the list.
- Pros: Consistent throughout the system as this check is enforced on all schedules being added to the
Aspect: Checking for valid schedule:
-
Alternative 1 (current choice): Perform the check in
Schedule.- Pros: Easy to implement.
- Pros: Consistent throughout the system as it does not make any sense to have a schedule with a
StartTimeafter itsEndTime. - Cons: Have to handle the exception if an invalid schedule is being created.
-
Alternative 2: Perform the check in
AddScheduleCommand.- Pros: Allows for flexibility in the constraints.
- Cons: Have to repeatedly write logic to perform these checks every time a new
Scheduleneeds to be created in another class.
Edit schedule feature
The “Edit Schedule” feature allows users to edit an existing schedule in the address book. Below, we provide an example usage scenario and a detailed description of how the edit schedule mechanism behaves at each step.
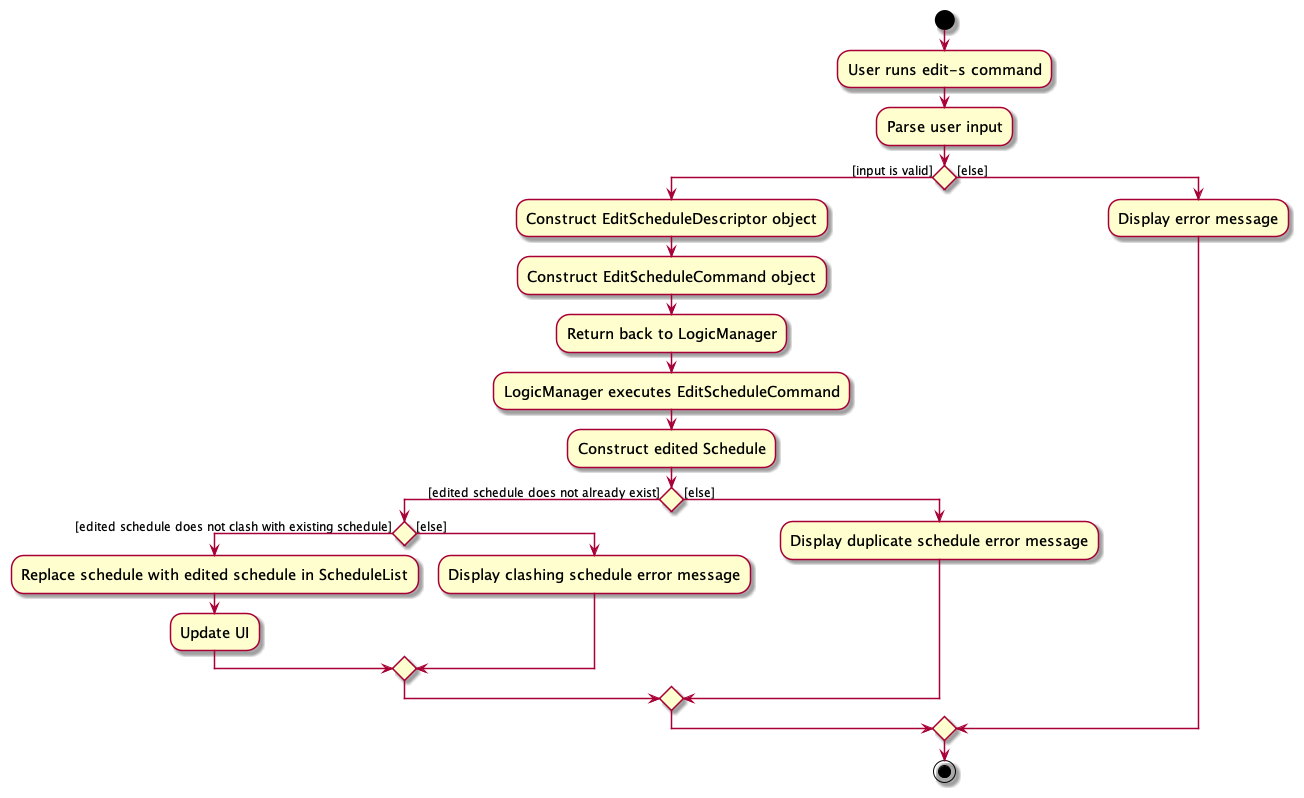
Implementation details
Step 1. The user has the application launched with at least 1 schedule added.
Step 2. The user executes list-s to view all added schedules.
Step 3. The user executes edit-s 1 st/2023-09-15T09:00 to edit the first schedule’s start time in the list of
schedules displayed. The command is parsed in AddressBookParser.
Step 4. EditScheduleCommandParser is created, and constructs an EditScheduleDescriptor which describes the edited
Schedule. An EditScheduleCommand object is then constructed with this EditScheduleDescriptor and the
specified schedule index.
Step 5. The EditScheduleCommand object gets the specified Schedule from the current filtered schedule list using the
schedule index.
Step 6. EditScheduleCommand object then creates an edited Schedule from the specified Schedule and the
EditScheduleDescriptor.
Step 7. EditScheduleCommand object then calls the setSchedule method in the ModelManager with the new edited Schedule.
This method sets the specified Schedule in the model to be that edited Schedule.
Step 8. Finally, the EditScheduleCommand object updates the schedule list to display the edited Schedule.
The following sequence diagram shows how the above steps for edit schedule operation works:
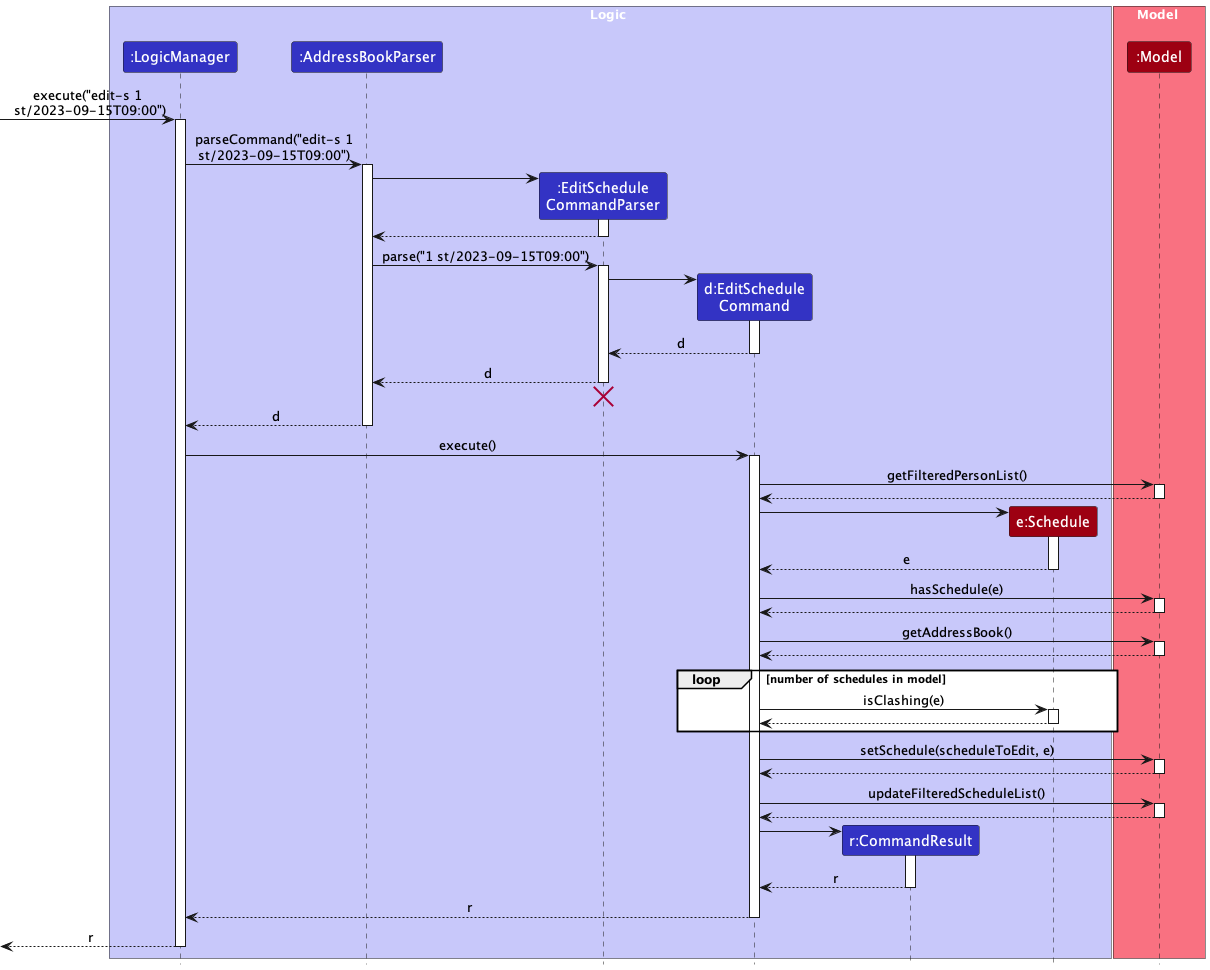
EditScheduleCommandParser should end at the destroy marker (X) but due to a limitation of PlantUML,
the lifeline reaches the end of diagram.
Design rationale
Aspect: Setting of schedule status
-
Alternative 1: Use an additional prefix to edit the status of a schedule.
- Pros: Allows users to directly edit the schedule status using the edit schedule command.
- Cons: Edit schedule command would have a considerable number of tags (it already has 3). It would also not match up with add schedule command.
-
Alternative 2 (current choice): Have a separate command for setting schedule status.
- Pros: It is more intuitive to the user and separates the responsibility of edit schedule.
- Cons: Requires separate commands for marking and unmarking schedule status.
Aspect: Reassigning of tutor
-
Alternative 1: Allow user to edit the tutor allocated to the schedule.
- Pros: Allows users to easily modify schedule details, including allocated tutor.
- Cons: Users will need to provide the schedule index to identify the schedule to be edited, and provide the tutor index that the schedule should be allocated to. This is difficult to implement with one list view.
-
Alternative 2 (current choice): Users cannot edit the tutor allocated to the schedule.
- Pros: An additional optional flag is not needed, and the new tutor to be allocated does not need to be identified from the tutor list.
- Cons: In the editing of schedule, a
Personis needed to create a newSchedule. Thus, the tutor allocated to the target schedule needs to be obtained and used to create a newSchedule.
List schedule feature
The “List Schedule” feature allows users to list schedules in the address book. Below, we provide an example usage scenario and a detailed description of how the list schedule mechanism behaves at each step.
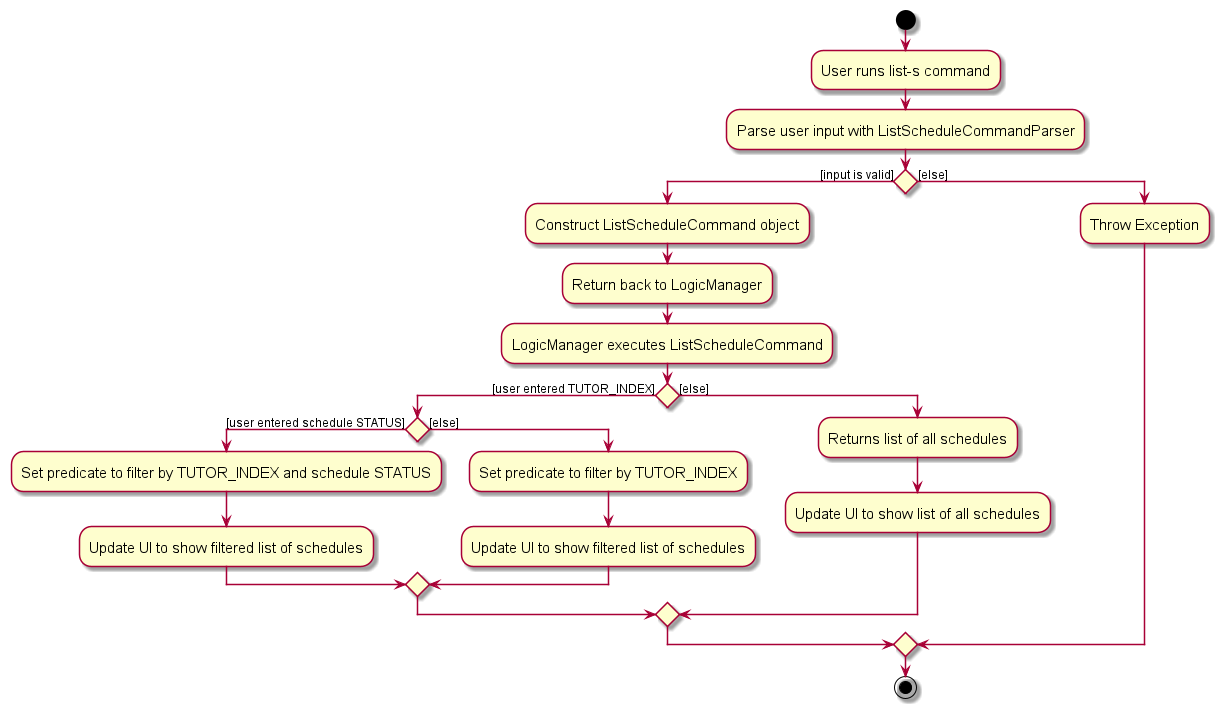
Implementation details
Step 1. The user has the application launched with at least 1 schedule added.
Step 2. The user executes list-s to view all added schedules.
Step 3. The user can also choose to execute list-s 1 m/0 where the Index and Status are optional parameters.
Step 4. The ListScheduleCommandParser will be initialised to parse the user input, checking for Index and Status. If they are provided but invalid, it will throw a ParseException.
Step 5. The ListScheduleCommandParser will then create a ListScheduleCommand with a Index and Status representing the user’s input.
Step 6. If Index is a valid integer, but it is not within the schedule list of indexes, ListScheduleCommand::execute will return CommandException .
Step 7. ListScheduleCommand::execute then creates TutorPredicate, StatusPredicate or both predicates, depending on what parameters are present in the user input for Index and Status respectively.
Step 8. ListScheduleCommand::execute then calls ModelManager::getFilteredScheduleList with the predicate as the argument.
This method updates the list of schedule in the model according to the predicate conditions and filters them.
Step 9. Finally, the ListScheduleCommand object updates the schedule list to display the filtered schedules.
The following sequence diagram shows how the above steps for list schedule operation works:
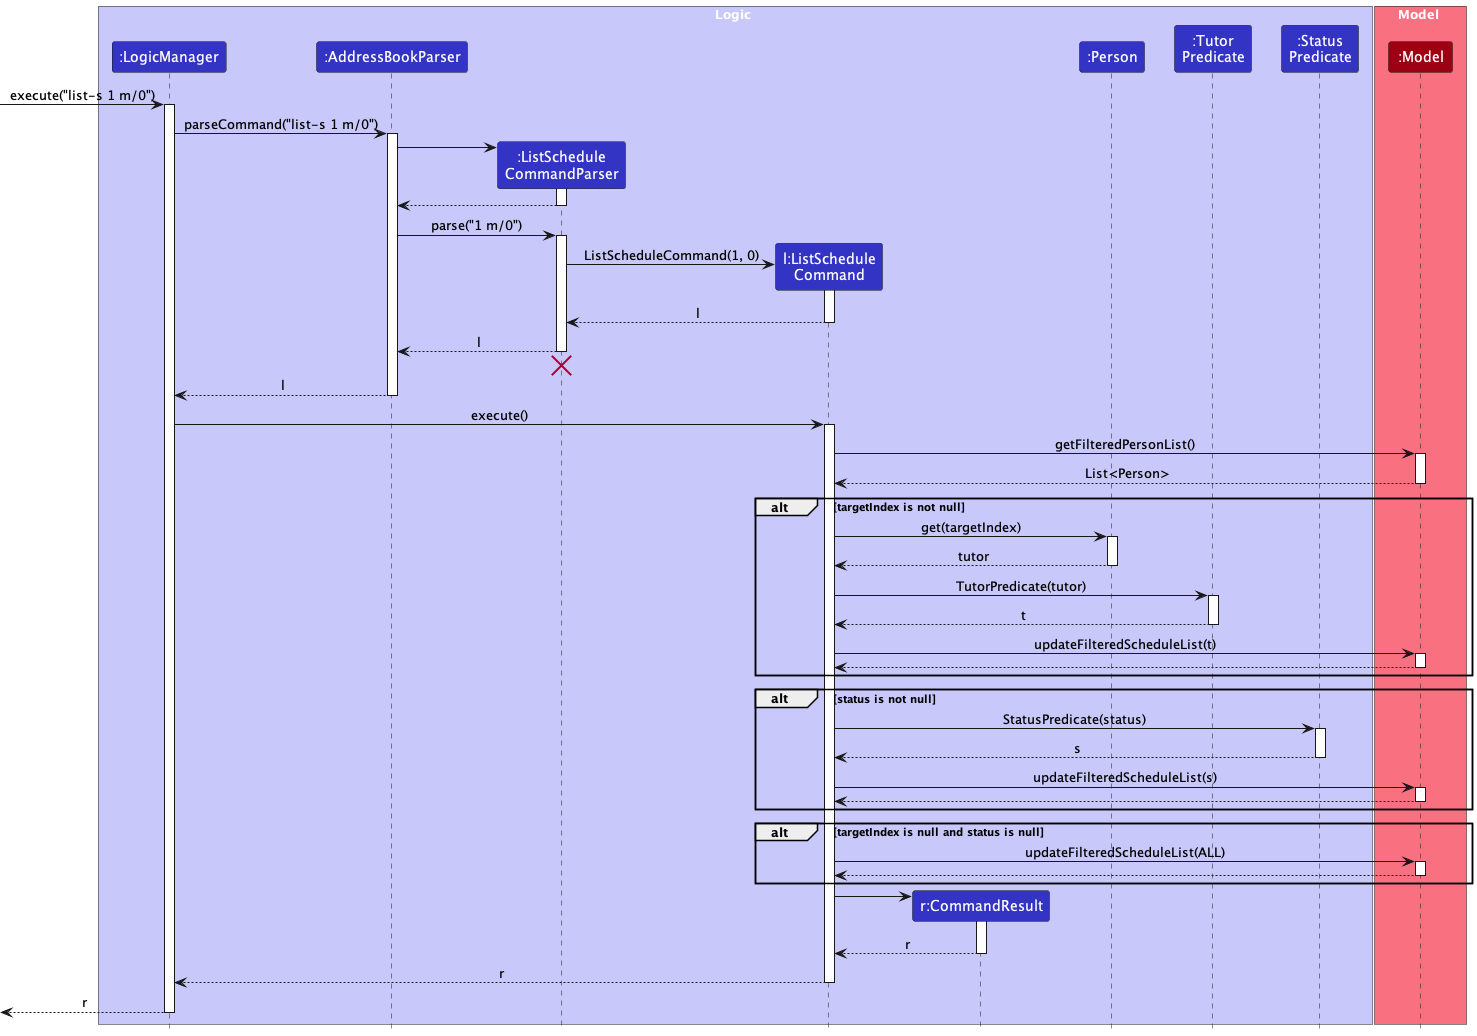
ListScheduleCommandParser should end at the destroy marker (X) but due to a limitation of PlantUML,
the lifeline reaches the end of diagram.
Design rationale
Aspect: Filtering schedule by tutor name
-
Alternative 1: Use an additional prefix to filter the list of schedules by tutor name.
- Pros: Provides users the flexibility to various filter options in 1 command.
- Cons: Too many prefixes and parameters for listing a schedule, which will make it too different from its
list-tcommand counterpart in usage.
-
Alternative 2 (current choice): Have a separate command for finding schedule by tutor name.
- Pros: It is more intuitive to the user since there is already a similar command
find-t. - Cons: Requires separate commands for searching schedules by keywords in the tutor’s name.
- Pros: It is more intuitive to the user since there is already a similar command
Find schedule feature
The “Find Schedule” feature allows users to search for schedules based on the tutor’s name.
The following shows the activity diagram from when a user executes the find-s command:
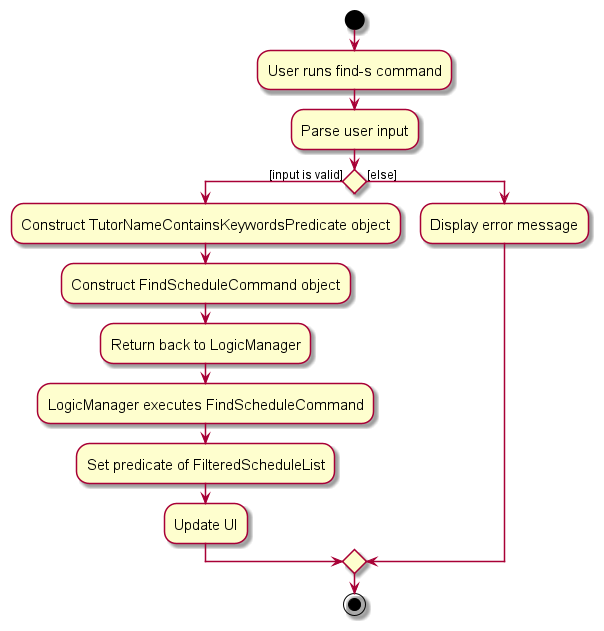
Implementation details
Step 1. The user has the application launched.
Step 2. The user executes find-s John Doe to search for tutors whose name contains “John” or “Doe. The command is parsed in the
AddressBookParser.
Step 3. FindScheduleCommandParser is created, and constructs a TutorNameContainsKeywordsPredicate which matches for any of
the search keywords. A FindScheduleCommand object is then constructed with this predicate.
Step 4. The LogicManager calls the execute method in FindScheduleCommand which sets the predicate of the filtered schedule
list in ModelManager to be the predicate created earlier.
Step 5. The result of the command execution is encapsulated as a CommandResult object which is returned back from
Logic.
Step 6. The filtered list of schedules is displayed to the user.
The following sequence diagram shows how the above steps for find tutor operation works:
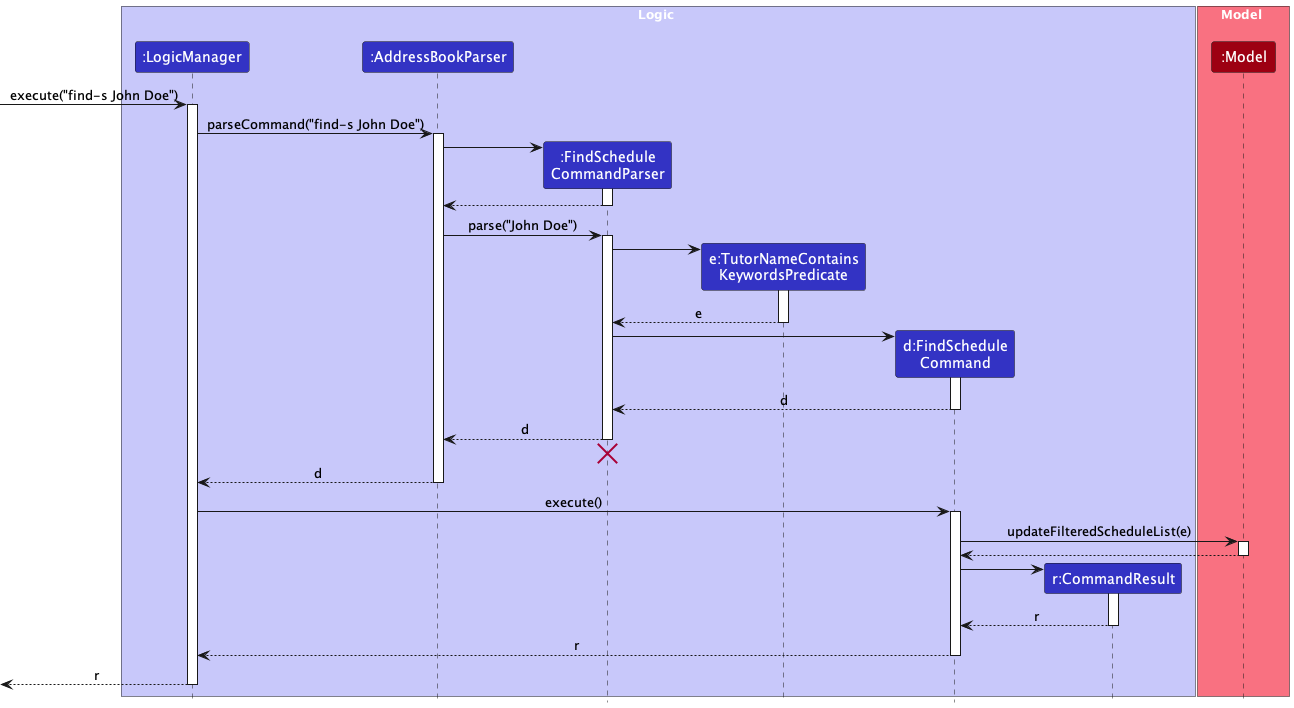
FindScheduleCommandParser should end at the destroy marker (X) but due to a limitation of PlantUML,
the lifeline reaches the end of diagram.
Design Rationale
Aspect: Search criteria
-
Alternative 1 (current choice): Only allowing users to search for schedules based on their names.
- Pros: This design provides a straightforward and clear search functionality for users, aligning with the common understanding of searching for specific schedules by the assigned tutor’s name.
- Pros: It simplifies the search process and reduces cognitive load for users, as they only need to provide the tutor’s name.
- Cons: If a user has incomplete or incorrect information about the tutor’s name, they may not be able to find the desired schedule assigned by that tutor.
-
Alternative 2: Specifying search criteria like start date time or end date time.
- Pros: Users would have the ability to search for schedules based on a wider range of criteria, such as start date time and end date time.
- Cons: Implementing advanced search criteria may lead to a more complex user interface and search mechanism, potentially requiring additional user training or guidance.
Mark schedule feature
The “Mark Schedule” feature allows users to mark a specified schedule as missed or completed. Below, we provide an example usage scenario and a detailed description of how the mark schedule mechanism behaves at each step.
The following shows the activity diagram when a user executes the mark command:
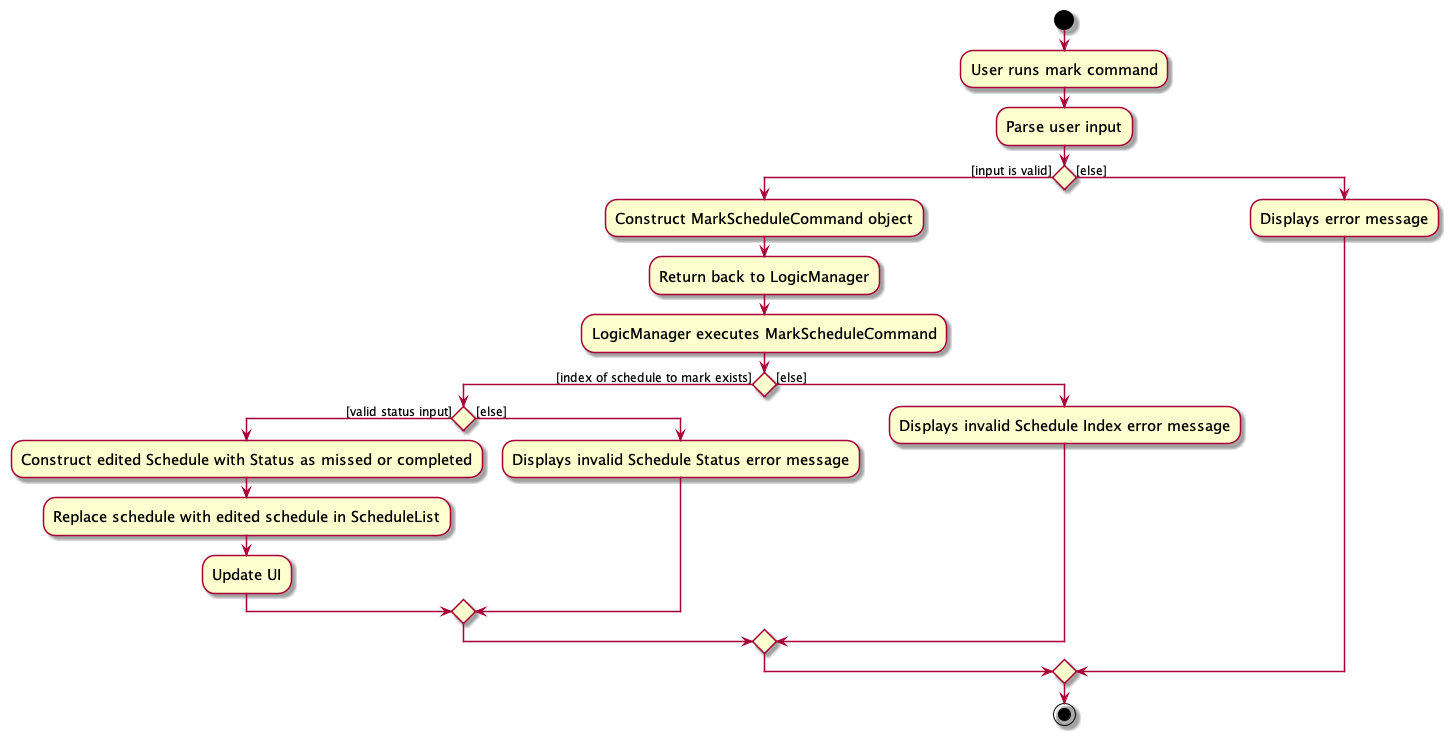
Implementation details
Step 1. The user has the application launched with at least 1 schedule added.
Step 2. The user executes the list-s to view the list of schedules.
Step 3. The user executes the mark 1 m/1 command, which marks the schedule with index 1 shown in the list of
schedules displayed as completed. The command is parsed in the AddressBookParser.
Step 4. MarkScheduleCommandParser is initialized to parse the user input to create a MarkScheduleCommand with
the given Index and Status representing the user’s input.
Step 5. The MarkScheduleCommand#execute(Model) will perform the following checks in this order to ensure that the
schedule can be safely marked as completed in the Model:
- The
Indexis a valid integer. - The
Indexis not out of bounds (within the range of displayed schedule list’s size). - The
Statusis valid (either 0 for missed or 1 for completed).
Step 6. The execute method then calls Model::getFilteredScheduleList and gets the specified Schedule using the
Index given.
Step 7. Once the checks are successful, the method then creates an edited Schedule from the original Schedule with its
status set to completed.
Step 8. The method then calls the setSchedule method in the ModelManager with the new edited Schedule. This sets the
specified Schedule in the model to be that edited Schedule with completed status.
Step 9. The result of the command execution is encapsulated as a CommandResult object which is returned back from
Logic.
The following sequence diagram shows how the above steps for mark schedule operation works:
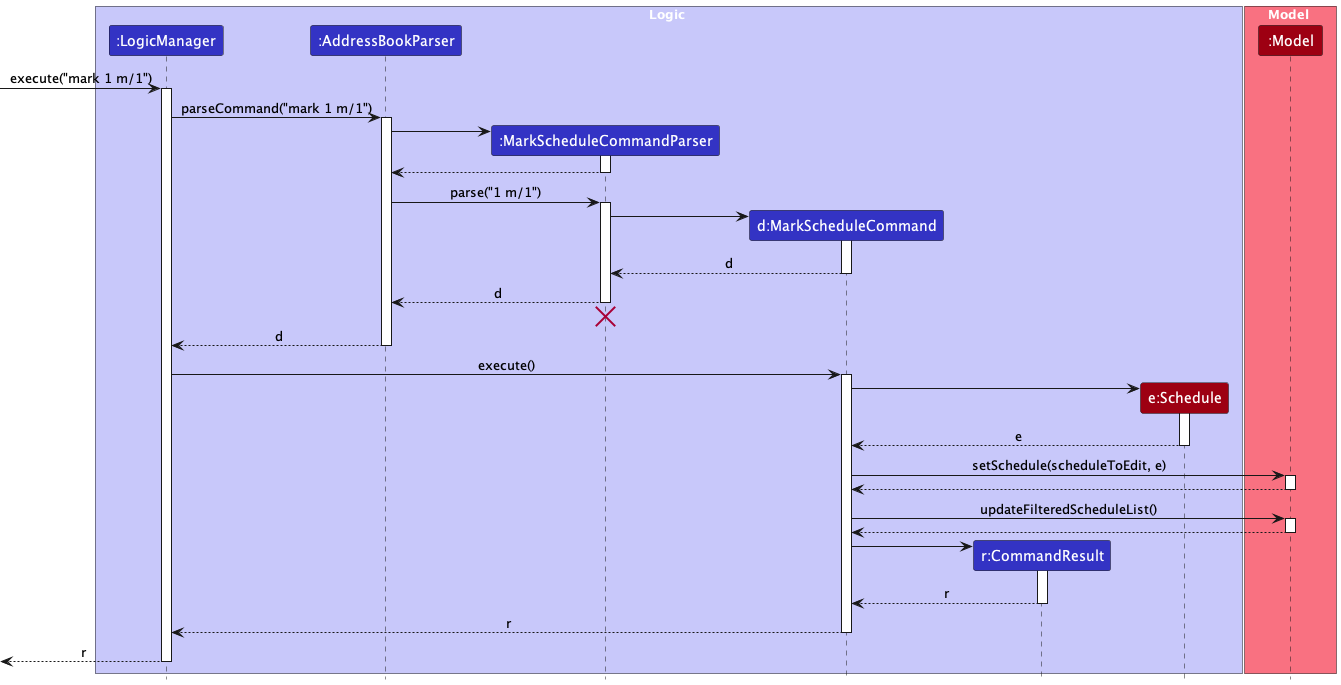
MarkScheduleCommandParser should end at the destroy marker (X) but due to a limitation of PlantUML,
the lifeline reaches the end of diagram.
Design rationale
Aspect: Usage of the pending status
-
Alternative 1 (current choice): Users unable to mark a schedule as
pending.- Pros: This design is more intuitive for users, as it aligns with the common understanding of marking and unmarking tasks.
- Pros: Users only need to be aware of the completed and missed status, simplifying the command’s usage.
- Cons: The user must use a distinct command to unmark schedules with a status set.
-
Alternative 2: Users able to mark a schedule as
pending.- Pros: Users only need to be familiar with the
markcommand, which can toggle between completed, missed, and pending statuses. This may lead to a more streamlined user experience. - Cons: Introducing a third status option complicates the management of schedule statuses. Users and developers alike must account for an additional state, potentially increasing the system’s complexity.
- Cons: The definition and usage of the
pendingstatus may vary among users, potentially leading to ambiguity in its interpretation.
- Pros: Users only need to be familiar with the
Aspect: Format of schedule status
-
Alternative 1 (current choice): Users input integers
0or1to mark a schedule asmissedorcompleted.- Pros: Using integers provides a clear and unambiguous way for users to specify which status they want to
mark for the specified schedule. The index corresponds directly to the schedule status of
missed, orcompleted, making it easy to identify the correct schedule status. - Pros: The use of integers eliminates the potential challenge of dealing with case-sensitive words. Users do not need to type out the exact status word by word, which can be especially beneficial if a user is not a very good at typing.
- Pros: The use of integers aligns with the existing command structure, which is based on numeric indices for identifying and interacting with specific entries in the address book.
- Cons: Users need to have knowledge of the specific integer representing the schedule status they want to mark.
- Pros: Using integers provides a clear and unambiguous way for users to specify which status they want to
mark for the specified schedule. The index corresponds directly to the schedule status of
-
Alternative 2: Users input the exact schedule status
missedorcompletedin words.- Pros: Allowing users to mark a schedule by specifying their schedule status provides a more natural and intuitive method, as users are likely more familiar with status than numeric integers.
- Cons: If a user provides an incorrect or misspelled status, the application would need to handle error cases and provide appropriate feedback to guide the user.
- Cons: Typing out schedule status in words are case-sensitive. This means that users need to accurately input the schedule status with the correct capitalization, which can add an extra layer of precision required from the user.
Aspect: Number of m/ tags accepted
-
Alternative 1 (current choice): Users input more than one
m/tags and only the lastm/tag is taken.- Pros: Users who are fast typists can easily correct earlier mistakes without deleting text.
- Pros: There are less erroneous behaviours that will result in failure of the command (e.g. entering
m/0 m/0
m/1
will result in the schedule being marked ascompleted, as opposed to encountering an error). - Cons: Some users may be confused about the behaviour of the command especially if tags provided are conflicting.
-
Alternative 2: Users input only one
m/tag. Multiple tags will result in an error.- Pros: The command is unambiguous to use, since multiple (hence conflicting) tags are not accepted.
- Cons: It is inconvenient for fast typists to have to go back to previously typed commands to edit fields.
Unmark schedule feature
The “Unmark Schedule” feature allows users to unmark a schedule that was previously marked as completed or missed.
The following shows the activity diagram from when a user executes the unmark command:
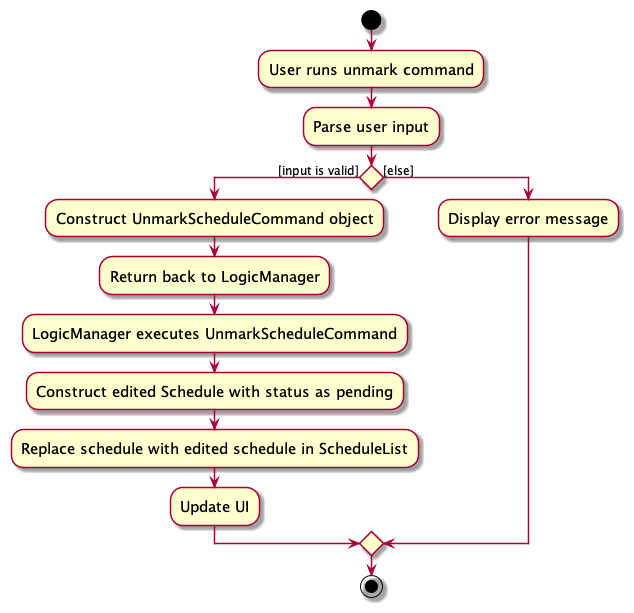
Implementation details
Step 1. The user has the application launched with at least 1 schedule marked as completed or missed.
Step 2. The user executes list-s to view the list of schedules.
Step 3. The user executes unmark 1 command, which unmarks the schedule with index 1 shown in the list of schedules
displayed. The command is parsed in the AddressBookParser.
Step 4. UnmarkScheduleCommandParser is initialized to parse the user input to create an UnmarkScheduleCommand with
the given Index representing the user’s input.
Step 5. The UnmarkScheduleCommand#execute(Model) will perform the following checks in this order to ensure that the
Schedule can be safely unmarked in the Model:
- The
Indexis a valid integer. - The
Indexis not out of bounds (within the range of the displayed schedule list’s size).
Step 6. The execute method then calls Model::getFilteredScheduleList and gets the specified Schedule using the
Index given.
Step 7. Once the checks are successful, the method then creates an edited Schedule from the original Schedule with its
Status set to pending.
Step 8. The method then calls the setSchedule method in the ModelManager with the new edited Schedule. This sets the
specified Schedule in the model to be that edited Schedule with pending status.
Step 9. The result of the command execution is encapsulated as a CommandResult object which is returned back from
Logic.
The following sequence diagram shows how the above steps for unmark schedule operation works:
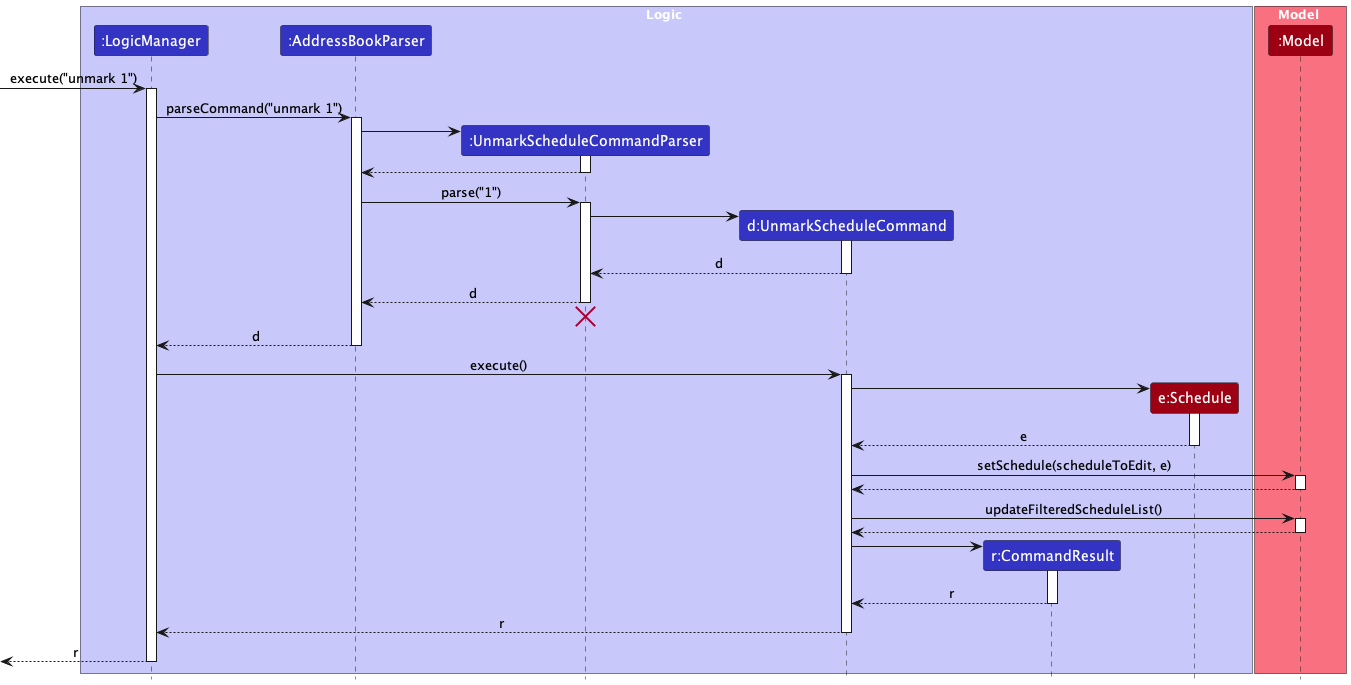
UnmarkScheduleCommandParser should end at the destroy marker (X) but due to a limitation of PlantUML,
the lifeline reaches the end of diagram.
Design rationale
Aspect: Existence of unmark command
-
Alternative 1 (current choice): Separate
unmarkcommand for unmarking schedules.- Pros: This design is more intuitive for users, as it aligns with the common understanding of marking and unmarking tasks.
- Pros: Users only need to be aware of the completed and missed status, simplifying the command’s usage.
- Cons: The user must use a distinct command to unmark schedules with a status set.
-
Alternative 2: Using a pending status with
markCommand.- Pros: Users only need to be familiar with the mark command, which can toggle between completed, missed, and pending statuses. This may lead to a more streamlined user experience.
- Cons: Introducing a third status option complicates the management of schedule statuses. Users and developers alike must account for an additional state, potentially increasing the system’s complexity.
- Cons: The definition and usage of the “pending” status may vary among users, potentially leading to ambiguity in its interpretation.
Delete schedule feature
The “Delete Schedule” feature allows users to delete an existing schedule in the address book given a schedule index. Below, we provide an example usage scenario and a detailed description of how the delete schedule mechanism behaves at each step.
The following shows the activity diagram when a user executes the delete-s command:
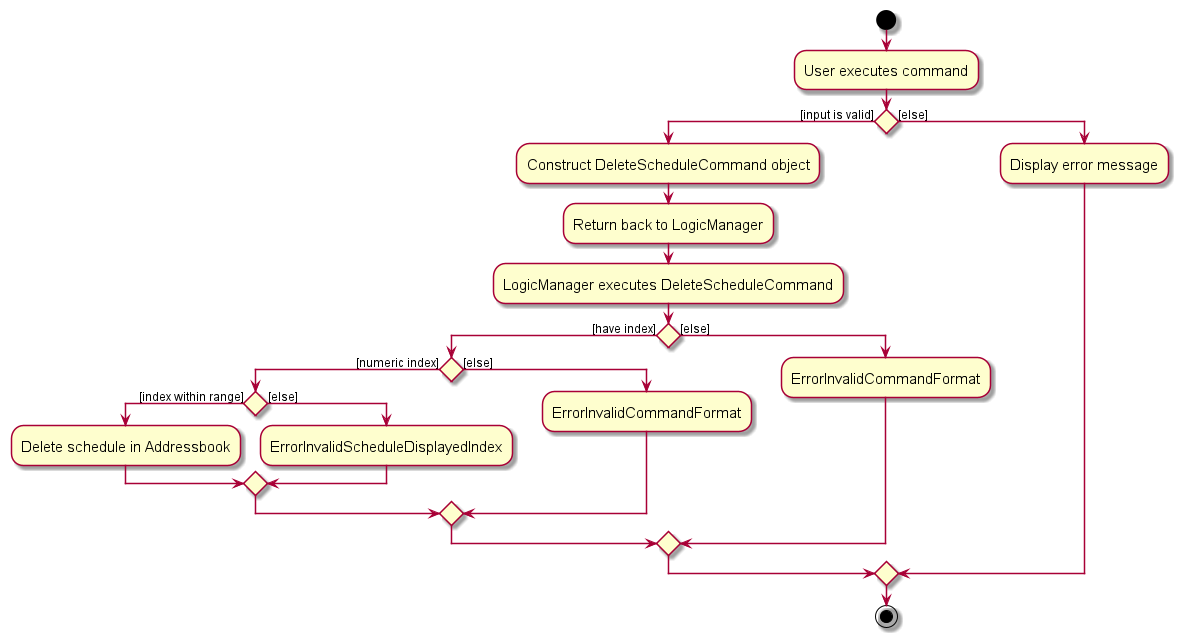
Implementation details
The delete schedule feature is facilitated by DeleteScheduleCommand, which extends from Command with the necessary implementation to delete a schedule by a given index.
The following operation is exposed in the abstract Command class as an abstract method:
-
DeleteScheduleCommand#execute(Model)- Deletes the schedule from theModelusing the given index.
Given below is an example scenario on how the delete schedule command behaves:
Step 1. The user has the application launched with at least 1 schedule added.
Step 2. The user executes list-s to view the list of schedules.
Step 3. The user executes delete-s 1 command, which deletes the schedule with index 1 shown in the list of schedules displayed. The command is parsed in the AddressBookParser.
Step 4. DeleteScheduleCommandParser is initialized to parse the user input to create a DeleteSchedulecommand with the given Index representing the user’s input.
Step 5. The DeleteScheduleCommand#execute(Model) will perform the following checks in this order to ensure that Schedule can be safely deleted from the Model:
- The
Indexis a valid integer. - The
Indexis not out of bounds.
Index is considered valid if it’s within the range of the schedule list’s size. This is enforced by throwing an CommandException if it is not valid.
Step 6. The execute method will then call Model::getFilteredScheduleList and get the specified Schedule using the Index given.
Step 7. Once the checks are successful, the method then calls Model::deleteSchedule in ModelManager to delete the specified Schedule in the model.
Step 8. Finally, the DeleteScheduleCommand returns the CommandResult.
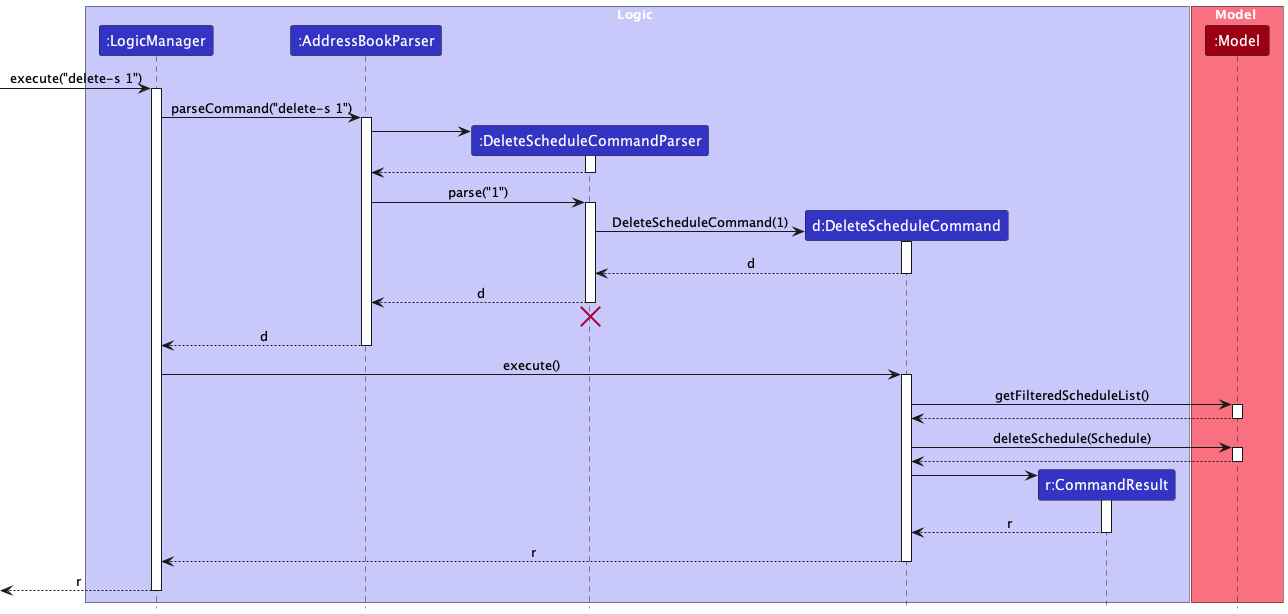
The following sequence diagram shows how the above steps for delete schedule operation works, taking execute("delete-s 1") API call as an example.
Design rationale
The delete-s command was designed this way to ensure consistency with the previous delete in AB3.
Show calendar feature
The “Show Calendar” feature allows users to view schedules based on a specific date.
The following shows the activity diagram from when a user executes the show command:
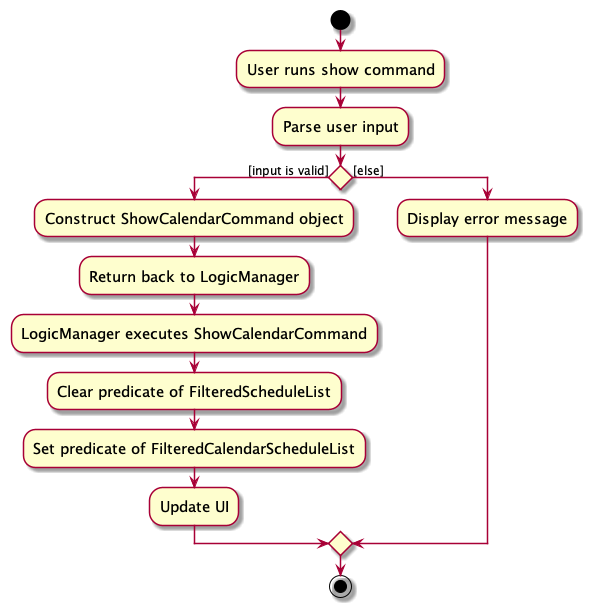
Implementation details
Step 1. The user has the application launched.
Step 2. The user executes show 2023-09-15 to view schedules for September 15, 2023. The command is parsed in the
AddressBookParser.
Step 3. ShowCalendarCommandParser is created, which constructs a Date based on the user-provided date.
A ShowCalendarCommand object is then constructed with this date.
Step 4. The LogicManager calls the execute method in ShowCalendarCommand, setting the predicate for the filtered
schedules list in ModelManager to be the predicate that shows all schedules and setting the predicate for the filtered
calendar schedules list in ModelManager to only display schedules on the specified date.
Step 5. The filtered list of schedules for the specified date is displayed to the user.
The following sequence diagram shows how the above steps for the show calendar operation work:
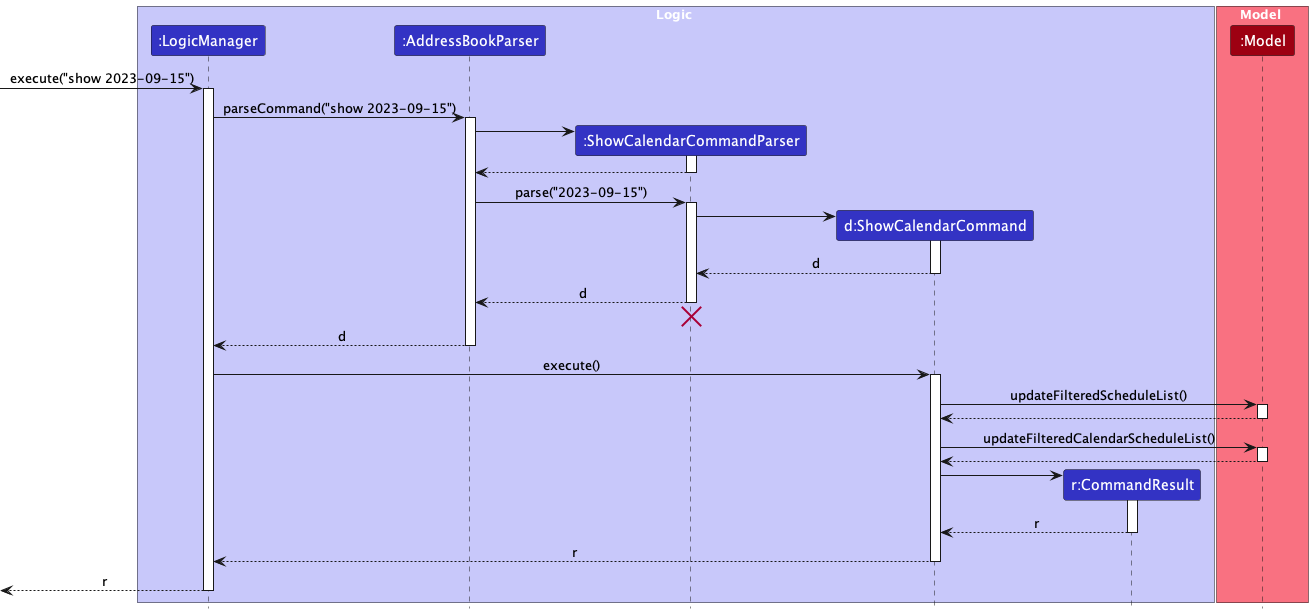
ShowCalendarCommandParser should end at the destroy marker (X) but due to a limitation of PlantUML,
the lifeline reaches the end of diagram.
Design rationale
Aspect: Defining which tutor to display for calendar
-
Alternative 1 (current choice): Show calendar for all tutors
- Pros: Provides a comprehensive view of schedules for all tutors, allowing users to see the entire schedule at a glance.
- Pros: Offers a unified view that may be suitable for administrators or users managing multiple tutors.
- Cons: May present a large amount of information, potentially leading to information overload for users with many tutors.
- Cons: Users may need to filter or navigate through a longer list of schedules to find the specific information they are interested in.
-
Alternative 2: Specify tutor to show calendar for.
- Pros: Offers a focused view of schedules for a particular tutor, allowing users to quickly access and manage the schedule for that specific individual.
- Pros: Reduces visual clutter and streamlines the user interface for users primarily interested in one tutor.
- Cons: May not be as suitable for administrators or users managing multiple tutors, as they may need to switch between tutors to view their respective schedules.
- Cons: Users may need to specify the tutor they want to view, requiring additional input.
Change theme feature
The “Change Theme” feature allows users to change the colour theme of the address book. Below, we provide an example usage scenario and a detailed description of how the change theme mechanism behaves at each step.
Implementation details
Step 1. The user launches the application for the first time.
Step 2. The user executes theme dark to change the address book theme to dark. The command is parsed in
AddressBookParser.
Step 3. ThemeCommandParser is created. The ThemeCommand is called with the filepath and theme to be changed to.
Step 4. The ThemeCommand object returns the CommandResult where isTheme is true.
Step 5. The handleChangeTheme method is called from MainWindow with the new theme to change to.
![]() Saving to UserPrefs
In order for the app to apply the last used theme when run again, the theme has to be saved to
Saving to UserPrefs
In order for the app to apply the last used theme when run again, the theme has to be saved to GuiSettings on exit.
- Implementation of saving last used theme is similar to implementation of saving window width and height in AB3.
- An additional method
getCurrentThemeis called to obtain current theme duringhandleExit. - When the app is opened, the theme from
GuiSettingsis applied, along with window width and height. This is not depicted in the following sequence diagram, which focuses on implementation of changing theme.
The following sequence diagram shows how the above steps for change theme operation works:
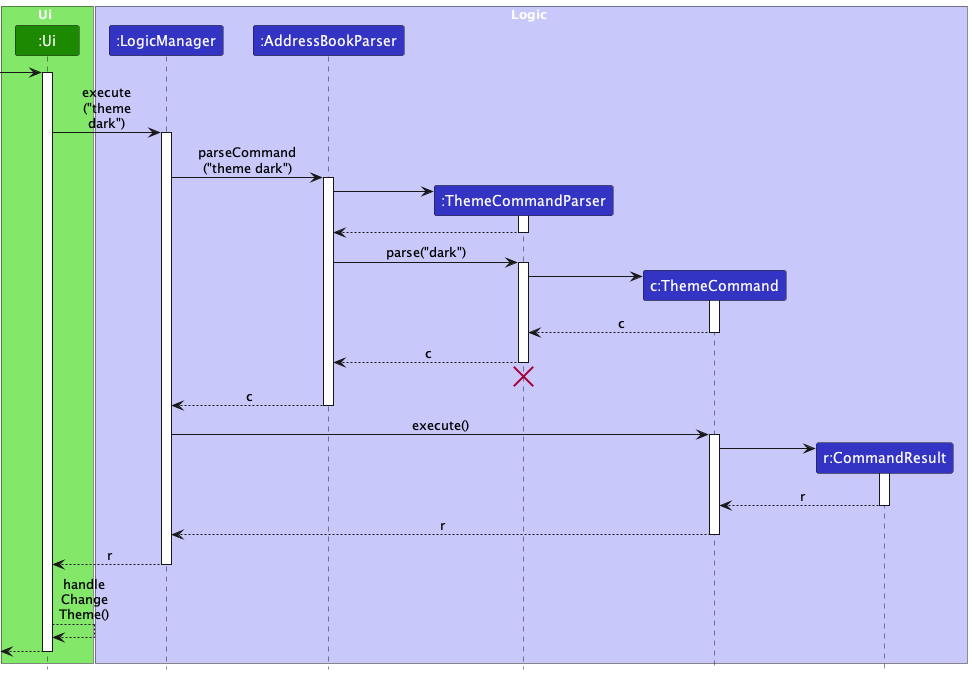
ThemeCommandParser should end at the destroy marker (X) but due to a limitation of PlantUML,
the lifeline reaches the end of diagram.
Design rationale
Aspect: Parsing the NEW_THEME
-
Alternative 1 (current choice): New theme is parsed and the filepath is allocated in
ThemeCommandParser.- Pros: This design is in line with how
FindTutorCommandandFindScheduleCommandobtain the keyword to implement predicate to get the filtered lists, within their respective parsers. - Cons: The filepath needs to be passed to
ThemeCommandto constructCommandResultwith the filepath. The filepath is then obtained fromCommandResultatMainWindow. - Cons: Thus,
CommandResultneeds another constructor and getter method.
- Pros: This design is in line with how
-
Alternative 2: New theme is parsed and the filepath is allocated in
AddressBookParser.- Pros: Switch cases are handled early and the command is verified in the same place it was parsed.
- Cons: The filepath needs to be passed to
ThemeCommandParserandThemeCommandto constructCommandResultwith the filepath. The filepath is then obtained fromCommandResultatMainWindow. - Cons: Thus,
CommandResultneeds another constructor and getter method.
-
Alternative 3: New theme is parsed and the filepath is allocated in
MainWindow.- Pros: The filepath does not need to pass through
ThemeCommandandCommandResult. It is allocated and access fromMainWindowdirectly. Thus,CommandResultdoes not need another constructor and getter method. - Cons:
MainWindowhas to parse arguments.
- Pros: The filepath does not need to pass through
Split MainWindow to display both tutor and schedule list together
The main window of TutorConnect now displays both the tutor and schedule list side by side to give users an overview and provide easy reference when inputting commands to update the tutors or schedules.
Implementation details
To display both the tutor and schedule list together, another panel ListsPanel is used to combine both the
PersonListPanel and ScheduleListPanel together in order to display them as a single panel in the MainWindow.
Design rationale
Initially, the list of tutors and schedules are individual panels and the MainWindow can only display one at a time.
Therefore, users have to enter list-t or list-s commands to alternate between panels to refer when entering
tutor-related commands followed by schedule-related commands or vice versa, which can be very troublesome.
With the use of ListsPanel to combine both lists into one single panel to display in the MainWindow, it eliminates
the need to alternate between panels as users can now enter tutor-related and schedule-related commands while having
reference to both lists at the same time, providing convenience for users.
Sorting of schedules
The list of schedules is sorted to be more organised and easier to navigate for users.
Implementation details
The schedules are sorted by implementing the Comparable interface and its required compareTo method.
Design rationale
Schedules are sorted by StartTime as start time is what tuition centre coordinators are most concerned with.
The schedules are divided into 2 parts: future and past, this organizes the schedules in a way that simplifies navigation for the users. This allows them to quickly differentiate between upcoming and past schedules.
The upcoming schedules are sorted in ascending order so that the most immediate schedules, which are the ones that are most relevant to the user at that point in time, is at the very top.
Past schedules are sorted in descending order, this keeps the more recent schedules readily accessible, while the older, less relevant schedules are at the bottom of the list.
Documentation, logging, testing, configuration, dev-ops
Appendix: Requirements
Product scope
Target user profile:
- has a need to manage a significant number of tutors and their schedules
- prefer desktop apps over other types
- can type fast
- prefers typing to mouse interactions
Value proposition: help tuition centre managers easily manage tutors and allocate their schedules without conflict.
User stories
Priorities: High (must have) - * * *, Medium (nice to have) - * *, Low (unlikely to have) - *
| Priority | As a … | I want to … | So that I can… |
|---|---|---|---|
* * * |
manager | add new tutors to the system | manage them |
* * * |
manager | store each tutor’s contact information, including their name, phone number, and email address | access it later |
* * * |
manager | remove tutors from the system when they are no longer available | keep the system up to date |
* * * |
manager | view a list of all tutors in the system | have an overview of available tutors |
* * * |
manager | find a tutor by their name | quickly find their information |
* * * |
manager | create a schedule for each tutor | track their schedule |
* * * |
manager | delete a schedule for a tutor | remove an appointment when the tutor is not available |
* * * |
manager | view a summary of all upcoming tutoring sessions | plan accordingly |
* * * |
manager | save the schedule and tutor’s information | can access it again in the future |
* * |
manager | find schedules by tutor name | easily plan the schedule of that tutor |
* * |
manager | view both tutors and schedules side by side together | perform actions related to the two without having to change my list view |
* * |
manager | view schedules in a sorted order | easily see upcoming schedules first |
* * |
manager | see where upcoming schedules end and where past schedules begin | distinguish between the two easily |
* * |
manager | mark sessions as attended or missed | track the status of tutoring sessions |
* * |
manager | unmark sessions | update the actual status of the session |
* * |
manager | keep a record of completed tutoring sessions | maintain a history of successful sessions |
* * |
manager | keep a record of missed tutoring sessions | monitor attendance and address any issues |
* * |
manager | edit the tutor information | update their details easily |
* * |
manager | edit the schedule information | reschedule tutoring sessions |
* * |
manager | view schedules by tutor | easily plan the schedule of that tutor |
* * |
manager | view the schedules of a given date as a calendar view | have a quick overview of the schedules and find available time slots |
* * |
manager | change the theme of TutorConnect | use a preferred colour theme |
* |
manager | have a help function | quickly check the command parameters without having to check the User Guide |
* |
manager | shorter syntax | work faster |
* |
manager | export data to an excel file | use the data for other purposes |
* |
manager | import data from an excel file | easily restore and update records |
* |
manager | add new students to the system | enrol them |
* |
manager | store each students contact information, including their name, phone number, and email address | access it later |
* |
manager | remove students from the system when they are no longer enrolled | maintain an accurate student list |
* |
manager | view a list of all students in the system | have an overview of enrolled students |
* |
manager | edit the student information | keep their details up to date |
* |
manager | assign specific tutors to a student | have personalised tutoring (one tutor to many students) |
* |
manager | reassign tutors to students | adapt to changing needs and preferences |
Use cases
Given below are the use cases for a few representative user stories that need multiple steps to complete.
AddressBook and the Actor is the user, unless specified
otherwise.
Use case: Edit a tutor
MSS
- User requests to list tutors.
- TutorConnect shows a list of tutors.
- User requests to edit a specific tutor information in the list.
-
TutorConnect modifies the tutor information.
Use case ends.
Extensions
-
2a. The list is empty.
Use case ends.
-
3a. The given index is invalid.
-
3a1. TutorConnect shows an error message.
Use case resumes at step 2.
-
-
3b. The tutor information parameters is invalid.
-
3b1. TutorConnect shows an error message.
Use case resumes at step 2.
-
Use case: Delete a tutor
MSS
- User requests to list tutors.
- TutorConnect shows a list of tutors.
- User requests to delete a specific tutor in the list.
-
TutorConnect deletes the tutor.
Use case ends.
Extensions
-
2a. The list is empty.
Use case ends.
-
3a. The given index is invalid.
-
3a1. TutorConnect shows an error message.
Use case resumes at step 2.
-
Use case: Add a schedule
MSS
- User requests to list tutors.
- TutorConnect shows a list of tutors.
- User requests to add a schedule for a specific tutor in the list.
-
TutorConnect adds the schedule and displays a list of schedule.
Use case ends.
Extensions
-
2a. The list is empty.
Use case ends.
-
3a. The given index is invalid.
-
3a1. TutorConnect shows an error message.
Use case resumes at step 2.
-
-
3b. The schedule parameters is invalid.
-
3b1. TutorConnect shows an error message.
Use case resumes at step 2.
-
Use case: Edit a schedule
MSS
- User requests to list schedules.
- TutorConnect shows a list of schedules.
- User requests to edit a specific schedule information in the list.
-
TutorConnect modifies the schedule information.
Use case ends.
Extensions
-
2a. The list is empty.
Use case ends.
-
3a. The given index is invalid.
-
3a1. TutorConnect shows an error message.
Use case resumes at step 2.
-
-
3b. The schedule information parameters is invalid.
-
3b1. TutorConnect shows an error message.
Use case resumes at step 2.
-
Use case: List schedules
MSS
- User requests to list schedules by tutor and/or schedule status.
-
TutorConnect shows a list of schedules.
Use case ends.
Extensions
-
1a. The given index is invalid.
-
1a1. TutorConnect shows an error message.
Use case resumes at step 1.
-
-
1b. The schedule status parameters is invalid.
-
1b1. TutorConnect shows an error message.
Use case resumes at step 1.
-
Use case: Find schedules
MSS
- User requests to find schedules by typing in keywords.
-
TutorConnect shows a list of schedules filtered by keyword entered.
Use case ends.
Use case: Delete a schedule
MSS
- User requests to list schedules.
- TutorConnect shows a list of schedules.
- User requests to delete a specific schedule in the list.
-
TutorConnect deletes the schedule.
Use case ends.
Extensions
-
2a. The list is empty.
Use case ends.
-
3a. The given index is invalid.
-
3a1. TutorConnect shows an error message.
Use case resumes at step 2.
-
Use case: Mark a schedule as completed
MSS
- User requests to list schedules.
- TutorConnect shows a list of schedules.
- User requests to mark a specific schedule in the list as completed.
-
TutorConnect marks the schedule as completed.
Use case ends.
Extensions
-
2a. The list is empty.
Use case ends.
-
3a. The given index is invalid.
-
3a1. TutorConnect shows an error message.
Use case resumes at step 2.
-
Use case: Unmark a schedule
MSS
- User requests to list schedules.
- TutorConnect shows a list of schedules.
- User requests to unmark a specific schedule in the list.
-
TutorConnect unmarks the schedule.
Use case ends.
Extensions
-
2a. The list is empty.
Use case ends.
-
3a. The given index is invalid.
-
3a1. TutorConnect shows an error message.
Use case resumes at step 2.
-
Use case: View schedules by tutor
MSS
- User requests to list tutors.
- TutorConnect shows a list of tutors.
- User requests to view schedules for a specific tutor in the list.
-
TutorConnect displays a list of schedules for the tutor.
Use case ends.
Extensions
-
2a. The list is empty.
Use case ends.
-
3a. The given index is invalid.
-
3a1. TutorConnect shows an error message.
Use case resumes at step 2.
-
Non-functional requirements
- Should work on any mainstream OS as long as it has Java
11installed. - Should be able to hold up to 1000 persons without a noticeable sluggishness in performance for typical usage.
- A user with above average typing speed for regular English text (i.e. not code, not system admin commands) should be able to accomplish most of the tasks faster using commands than using the mouse.
- Should work without requiring an installer.
- GUI should work well for standard screen resolutions 1920x1080 and higher, and, for screen scales 100% and 125%.
- GUI should be usable for resolutions 1280x720 and higher, and, for screen scales 150%.
- Should not require the user to have an internet connection to use.
- Should be a single-user application.
- Should persistently save data in a human-readable text file between sessions.
- Should be able to transfer the data file to another device with no loss of data.
Glossary
- Mainstream OS: Windows, Linux, Unix, OS-X.
- Use case: A description of a set of sequences of actions, including variants, that a system performs to yield an observable result of value to an actor.
- GUI: Graphical user interface.
Appendix: Instructions for manual testing
Given below are instructions to test the app manually.
Launch and shutdown
-
Initial launch
-
Download the jar file and copy into an empty folder.
-
Double-click the jar file Expected: Shows the GUI with a set of sample tutors and schedules. The window size may not be optimum.
-
-
Saving window preferences
-
Resize the window to an optimum size. Move the window to a different location. Close the window.
-
Re-launch the app by double-clicking the jar file.
Expected: The most recent window size and location is retained.
-
-
Saving theme preferences
-
Change the theme to another one. Close the window.
-
Re-launch the app by double-clicking the jar file.
Expected: The most recent theme is retained.
-
Adding a tutor
Adding a tutor while all tutors are being shown
-
Test case:
add-t n/John Doe p/98765432 e/johnd@example.com
Expected: The tutor is added at the end of tutor list. Details of the added tutor shown in the status message. -
Test case:
add-t n/Jonny p/12345678
Expected: No tutor is added. Error details shown in the status message. -
Other incorrect add tutor commands to try:
add-t,add-t n/abc,add-t n/abc p/1 e/abc@example.com,add-t n/abc p/12345678 e/abc
Expected: Similar to previous.
Deleting a tutor
Deleting a tutor while all tutors are being shown
-
Prerequisites: List all tutors using the
list-tcommand. Multiple tutors in the list. -
Test case:
delete-t 1
Expected: First tutor is deleted from the list. Details of the deleted tutor shown in the status message. -
Test case:
delete-t 0
Expected: No tutor is deleted. Error details shown in the status message. -
Other incorrect delete tutor commands to try:
delete-t,delete-t abc,delete-t x(where x is larger than the tutor list size)
Expected: Similar to previous.
Editing a tutor
Editing a tutor while all tutors are being shown
-
Prerequisites: List all tutors using the
list-tcommand. Multiple tutors in the list. -
Test case:
edit-t 1 n/John Dong p/98765432 e/johnd@example.com
Expected: First tutor’s name, phone number and email updated in tutor list. Details of edited tutor shown in the status message. -
Test case:
edit-t 1 n/Jonny p/12345678
Expected: First tutor’s name and phone number updated in tutor list. Details of edited tutor shown in the status message. -
Test case:
edit-t 1 n/Johnson
Expected: First tutor’s name updated in tutor list. Details of edited tutor shown in the status message. -
Test case:
edit-t 1
Expected: First tutor is not updated. Error details shown in the status message. -
Other incorrect edit tutor commands to try:
edit-t,edit-t abc,edit-t 1 n/abc p/1,edit-t 0 n/abc,edit-t 1 n/abc n/abc,edit-t 1 n/abc p/123 e/abc,edit-t x n/abc p/123 e/abc@exampl.com(where x is larger than the tutor list size)
Expected: Similar to previous.
Listing all tutors
Lists all existing tutors
-
Prerequisites: Multiple tutors in the list.
-
Test case:
list-t
Expected: All existing tutors are listed.Listed all tutorsis shown in the status message.
Finding a tutor
Finds a tutor while all tutors are being shown
-
Prerequisites: List all tutors using the
list-tcommand. Multiple tutors in the list. -
Test case:
find-t John
Expected: All tutors with names containing the searched keyword are listed. Number of tutors with names containing the searched keyword is shown in the status message. -
Test case:
find-t
Expected: No tutors are found. Error details shown in the status message.
Adding a schedule
Adds a schedule while all schedules are being shown
-
Prerequisites: List all tutors using the
list-tcommand. At least 1 existing tutor in the list. -
Test case:
add-s 1 st/2023-05-05T09:00 et/2023-05-05T11:00
Expected: New schedule for the first tutor in tutor list is added into the schedule list. Details of the added schedule shown in the status message. -
Test case:
add-s 1 st/2034-06-06T09:00
Expected: No new schedule added for the first tutor in tutor list. Error details shown in the status message. -
Other incorrect add schedule commands to try:
add-s,add-s abc,add-s 1 st/2023-05-05 et/2023-05-06,add-s 0 st/2023-05-05T09:00 et/2023-05-05T11:00,add-s 1 st/2023-05-05T09:00 st/2023-05-05T09:00,add-s x st/2023-05-05T09:00 et/2023-05-05T11:00(where x is larger than the tutor list size)
Expected: Similar to previous.
Editing a schedule
Edits a schedule while all schedules are being shown
-
Prerequisites: List all schedules using the
list-scommand. At least 1 existing schedule in the list. -
Test case:
edit-s 1 st/2023-05-05T11:00 et/2023-05-05T13:00
Expected: First schedule start and end time updated. Details of edited schedule shown in the status message. -
Test case:
edit-s 1 st/2023-05-05T05:00
Expected: First schedule start time updated. Details of edited schedule shown in the status message. -
Test case:
edit-s 1 et/2023-05-05T17:00
Expected: First schedule end time updated. Details of edited schedule shown in the status message. -
Test case:
edit-s 1
Expected: First schedule not updated. Error details shown in the status message. -
Other incorrect edit schedule commands to try:
edit-s,edit-s abc,edit-s 1 st/2023-05-05,edit-s 0 st/2023-05-05,edit-s 1 st/2023-05-05T05:00 st/2023-05-05T05:00,edit-s x et/2023-05-05T17:00(where x is larger than the schedule list size)
Expected: Similar to previous.
Listing all schedules
Lists all existing schedules that may be filtered by tutor index or schedule status.
-
Prerequisites: At least 1 existing schedule in the list.
-
Test case:
list-s
Expected: All existing schedules are listed.Listed all schedulesis shown in the status message. -
Test case:
list-s 1
Expected: All existing schedules for the first tutor in tutor list are listed. Number of schedules for the first tutor is shown in the status message. -
Test case:
list-s m/1
Expected: All existing schedules marked with the completed status are listed. Number of completed schedules are listed in the status message. -
Test case:
list-s 1 m/0
Expected: All existing schedules for the first tutor marked with the completed status are listed. Number of completed schedules for the first tutor is shown in the status message. -
Test case:
list-s 0
Expected: No change to the schedule list displayed. Error details shown in the status message. -
Other incorrect list schedule commands to try:
list-s,list-s abc,list-s m/0 m/1,list-s x(where x is larger than the tutor list size)
Expected: Similar to previous.
Finding a schedule
Finds a schedule while all schedules are being shown
-
Prerequisites: List all schedules using the
list-scommand. At least 1 existing schedule in the list. -
Test case:
find-s John
Expected: All schedules with tutor names containing the searched keyword are listed. Number of schedules with tutor names containing the searched keyword is shown in the status message. -
Test case:
find-s
Expected: No schedules are found. Error details shown in the status message.
Marking a schedule
Marks a schedule as missed or completed while all schedules are being shown
-
Prerequisites: List all schedules using the
list-scommand. At least 1 existing schedule in the list. -
Test case:
mark 1 m/1
Expected: First schedule marked with the completed status. Details of the marked status shown in the status message. -
Test case:
mark 1
Expected: No schedule is marked. Error details shown in the status message. -
Other incorrect mark commands to test:
mark,mark 0 m/0,mark 1 m/3,mark abc,mark x m/0(where x is larger than the schedule list size)
Unmarking a schedule
Unmarks a schedule while all schedules are being shown
-
Prerequisites: List all schedules using the
list-scommand. At least 1 existing marked schedule in the list. -
Test case:
unmark 1
Expected: Status of first schedule is removed. Details of the unmarked schedule is shown in the status message. -
Test case:
unmark 0
Expected: No schedule status is removed. Error details shown in the status message. -
Other incorrect unmark commands to test:
unmark,unmark abc,unmark m/1,unmark x(where x is larger than the schedule list size)
Deleting a schedule
Deletes a schedule while all schedules are being shown
-
Prerequisites: List all schedules using the
list-scommand. At least 1 existing schedule in the list. -
Test case:
delete-s 1
Expected: First schedule is deleted from schedule list. Details of deleted schedule shown in the status message. -
Test case:
delete-s 0
Expected: No schedule is deleted. Error details shown in the status message. -
Other incorrect delete schedule commands to test:
delete-s,delete-s abc,delete-s x(where x is larger than the schedule list size)
Viewing calendar
Displays schedule on a specified day as a calendar view
-
Prerequisites: List all schedules using the
list-scommand. At least 1 existing schedule in the list. -
Test case:
show 2023-09-15
Expected: Schedules on 2023-09-15 are displayed in a calendar view.Viewing calendaris shown in the status message. -
Test case:
show 2023
Expected: No calendar view is shown. Error details shown in the status message. -
Other incorrect show commands to test:
show,show abc,show 123
Expected: Similar to previous.
Changing theme
Changes the theme of TutorConnect
-
Test case:
theme light
Expected: The theme of TutorConnect is changed to light colour scheme. Details of the changed theme is shown in the status message. -
Test case:
theme white
Expected: No theme change in TutorConnect. Error details shown in status message. -
Other incorrect theme commands to test:
theme,theme abc,theme LightExpected: Similar to previous.
Appendix: Planned enhancements
Given below are the planned enhancements for future iterations of the app.
Tutor name case sensitivity
The current add tutor feature validates unique tutor names with case sensitivity (e.g. John DOe is different from john Doe). This may not be applicable in the real world. We plan to remove the case sensitivity check for tutor names.
Proposed implementation
In the isEquals method in the Name.java, the check for the same tutor using their names can be replaced with one
that removes capitalisation of the tutors’ names before checking if they are equal.
Editing a tutor allocated to a schedule
The edit-s function should allow users to edit the allocated tutor.
The current edit schedule feature does not allow editing of assigned tutor. We plan to
allow reassignment of tutor by adding a new prefix to edit schedule command t/ which allows users to specify a tutor index to reassign the
schedule to. Proper input validation and error handling would be in place to ensure safe modifications to the schedule.
In the planned enhancement of this feature, alternative 1 of reassigning the tutor will be implemented. This is possible because of the double list view.
This implementation will remove the need for the tutor of the schedule to be edited to be obtained and fixed.
Proposed implementation
Step 1. The user has the application launched with at least 1 schedule added.
Step 2. The user executes list-s to view all added schedules.
Step 3. The user executes edit-s 1 t/1 st/2023-09-15T09:00 to edit the first schedule’s start time in the list of
schedules displayed and to assign the schedule to the first tutor instead. The command is parsed in AddressBookParser.
Step 4. EditScheduleCommandParser is created, and constructs an EditScheduleDescriptor which describes the edited
Schedule. An EditScheduleCommand object is then constructed with this EditScheduleDescriptor and the
specified schedule index.
Step 5. The EditScheduleCommand object gets the specified schedule from the current filtered schedule list using the schedule index and the current filtered person list using the tutor index.
Step 6. EditScheduleCommand object then creates an edited schedule from the specified schedule, using the specified
tutor, and the EditScheduleDescriptor.
Step 7. EditScheduleCommand object then calls the setSchedule method in the ModelManager with the new edited schedule.
This method sets the specified Schedule in the model to be that edited schedule.
Step 8. Finally, the EditScheduleCommand object updates the schedule list to display the edited schedule.
Disallowing future schedules to be marked
The mark function should prohibit setting a schedule status if either the start or end time is in the future.
Proposed implementation
An extra validation should be included in the execute method within the MarkScheduleCommand to ensure that both the
scheduleToEdit’s start and end times are earlier than the current datetime.
If this validation fails, a CommandException with a clear and descriptive error message should be thrown.
Streamline datetime input
In the current implementation, the users have to enter yyyy-MM-ddTHH:mm each time for both StartTime and EndTime.
However, since a Schedule is not allowed to start and end on different days, the user is unnecessarily repeating the
input yyyy-MM-dd. This resulted in a command format that is longer than necessary. We plan to streamline the command
to make it shorter and more user-friendly.
Proposed implementation
The current st/ and et/ prefixes will be updated to take in HH:mm only. Additionally, this would require a new
prefix d/ which will parse user input in the yyyy-MM-dd format into a Date.
For example, any command that uses the st/ or et/ prefix will now use ... d/yyyy-MM-dd st/HH:mm et/HH:mm instead.
Tutor and schedule information view
In the current implementation, tutors and schedules with long fields of over 40 characters are truncated. They can be seen by resizing the window. To improve user experience, the information should be able to be viewed by users without the window resizing.
Proposed implementation
In the PersonListCard and ScheduleListCard, the column constraints should be removed. This will add a horizontal
scroll bar in the event the information to be displayed is too long.
Calendar row view
In the current implementation, schedule details cannot be viewed in the calendar for schedules that are shorter than
45min long. The additional details are truncated. These details cannot be viewed even with resizing the window and
can only be viewed in the list-s view.
Proposed implementation
In the CalendarRow, the column constraints should be removed. This will add a horizontal scroll bar in the event
the information to be displayed is too long.
Switching back to list view from calendar view
In the current system, when executing any commands, including actions like marking, unmarking, or deleting schedules while in the calendar view, the GUI switches back to the main view displaying the list of tutors and schedules. This behavior can be disruptive and frustrating for the user.
To enhance user experience, we propose implementing a more persistent calendar view. This would allow the user to perform certain actions on schedules without being returned to the list view.
Only certain actions, such as adding or editing schedules, should return the user to the main list view. This is because these actions necessitate the clearing of any applied filter predicate including the one that was used to display schedules only for the specified date.
Conversely, other actions should keep the user within the calendar view.
Proposed implementation
A new boolean attribute exitCalendar will be added to CommandResult, which indicates whether the command executed
should exit the calendar view (if active).
The execute methods for commands like AddScheduleCommand and EditScheduleCommand will return a CommandResult
object with this new attribute set to true while all other commands will have the value false.
In the handleListDisplay method in MainWindow, it will call showLists only if this attribute is true and
do nothing otherwise. The only exception is if the commandResult FeedbackToUser is a
ShowCalendarCommand.MESSAGE_SUCCESS in which case it will call showCalendar.
Schedules at the same time being arranged alphabetically
In the current implementation, the schedules are being sorted by StartTime only.
This resulted in a situation where if you had many schedules starting at the same time, it would be very difficult to find and locate a particular schedule.
Proposed implementation
The schedules would be sorted first by StartTime, then by EndTime, and finally alphabetically by the tutor’s name.
This would make the schedule list more organised, making it easier to use and navigate for the user.
Accepting one input for theme change
In the current implementation, the theme command disregards any other input after the first. For example, theme
dark blue is regarded as theme dark. This may cause confusion for some users.
Proposed implementation
Within the parsing of the input in ThemeCommandParser, a ParseException would be thrown when more than one word
after the command word is detected. This means that theme dark blue would result in a ParseException and only one
word after the command word theme is accepted.
List schedule by pending status
In our current implementation, list-s only filters schedule by COMPLETED or MISSED status. Any schedules that have
not been assigned one of these statuses are categorised as unmarked, and it’s important to include them in the list-s results.
Proposed implementation
- Update
list-scommand andm/parameter value to accept an additional value for unmarked status to filter by, such asm/u. - This can be done by modifying
ListScheduleCommandParser.javaandStatus.javato map an integer to enumStatusthat represents umarked status. - When
ListScheduleCommand:executeruns, the command should accept another input fromm/parameter that represents the umarked status, such asm/u. - Then
Model::updateFilteredScheduleListwill take inStatusPredicate.javato filter schedules based on unmarked status.